
Creating Assests From Current File
This function is similar to Creating Assets from Directory in that most of the same functions will be available to you except for the Kitbash import options and save as a single blend file. These are removed here because those processes can only be done under specific conditions which are not met while inside an active blend file.

Intended use
This functions intended use is to mark content in a working file, ONCE you are done working in it, and wish to close the project. This functions will prompt you to save the file if we detect no save tags have been written. If you have already saved this file, you will see a new pop-up window in the 3d viewport.
ONCE YOU HAVE FINALIZED THE OPTIONS IN THE POPUP, THE FILE WILL CLOSE AND RUN THE PROCESS IN THE BACKGROUND. THIS IS SUPPOSED TO HAPPEN.
Menu Settings
Below is the menu that will appear in the 3d viewport when this option is clicked. This is the "Mark asset and quit" modal and mirrors similar options to the "mark assets from directory" function.
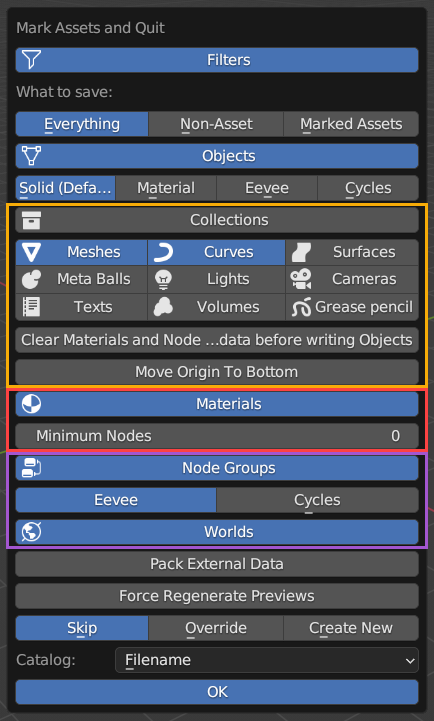
What to save
Choose between everything in the file, data that is NOT already marked as an asset, or just ALREADY marked assets.
Objects
This will open up options for all object types.
Thumbnail shading
Choose the type of thumbnail rendering you wish to have between Solid (grey unlit); Material (unlit material preview); Eevee (lit Eevee render); or Cycles (Path traced lit). Choosing between Material, Eevee, and Cycles will provide you with camera options and the option to add a white ground plane. If the ground plane is not chosen, the image will be rendered with a transparent background.
Thumbnail Rendering
Please be aware that different render engines may increase the process time. Eevee may not always be the fastest. Cycles can be quicker in come cases.
Object Data types
Selecting the following will bring them in to be marked as an asset. (Read below for Kitbash options)
Clear materials
This has caused some confusion in the past where users thought this clears the materials from the object, but this is different from what it does. It only removes their asset data, so they don’t appear in the object section of the True-Asset library.
Move Origin to Bottom
Enabling this option will identify the lowest face of the object based on its average data and set that point as the origin point.
Materials
Selecting this will allow materials to be brought in as their asset type (THIS DOES NOT MEAN THE MATERIALS ALREADY ON OBJECTS):
Minimum Nodes
True-Assets tries to avoid materials that it thinks are not important, like default materials and materials with less than a specified number of nodes. You can set this number using this field.
Node Groups
Currently, only Shader node groups are supported(though you can save Geometry Node groups by using right-click>’ Mark as Asset’ in the geometry node editor). The thumbnails for Node Groups are rendered using a Shader ball. You can choose the render engine you want to use for thumbnails since some nodes (like bevel) only work in Cycles.
Worlds
This will bring in any "world" data that was in the source file
Catalog
This drop down option will allow you to put the chosen .blends into a new or existing catalog.