
AmbientCG Uber
Shader Overview
The AmbientCG Uber Shader is a versatile shader designed to handle a wide range of material properties. It offers comprehensive controls for color adjustments, material settings, emission, texture data handling, surface properties, and mapping modes.
The shader is broken up into 7 distinct sections, in the UI using drop-down functions. This is to make the UI cleaner and allow the user to close information that is not needed. If you view this in the shader-editor, or the material properties, it will not look like the image on the left but will look like this:
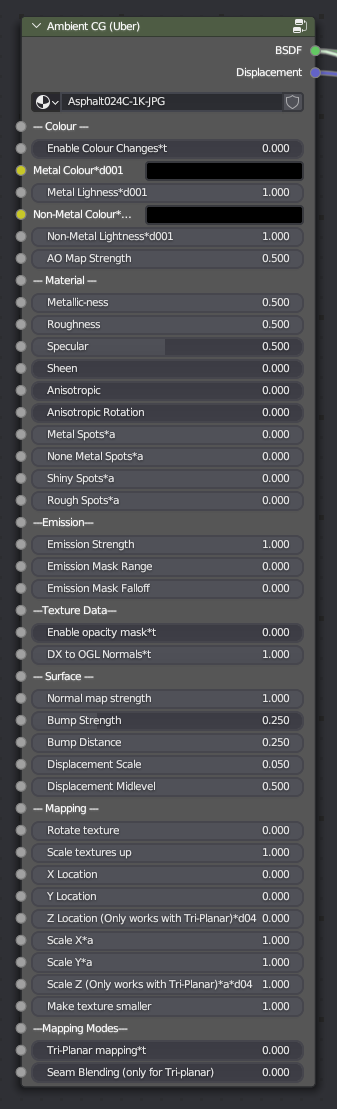
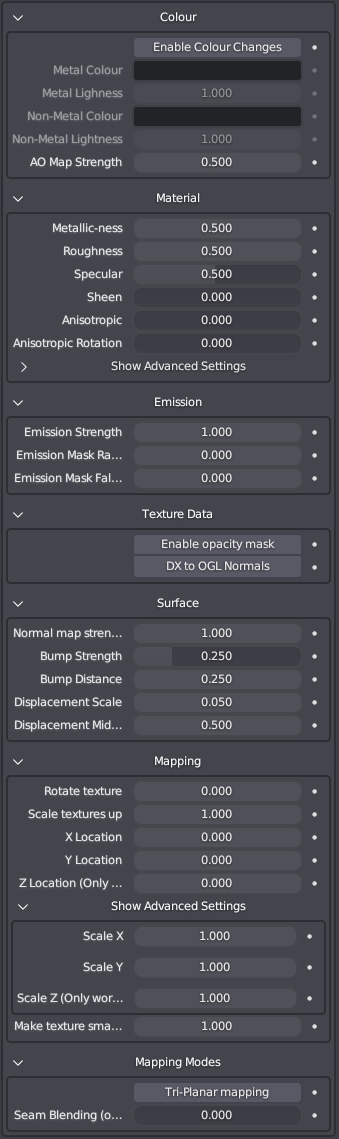
Shader Breakdown
You can find additional gifs on the Uber Shader page as this shader shares many similarities with it.
Colour
Enable Colour Changes: This slider allows for adjustment of the HUE values on the diffuse/albedo map, ranging from 0 to 1. This adjustment has no effect on grayscale maps and has limited impact on dark or very light hues.
Metal Colour: Use the color picker to choose a new color from the wheel. This adjustment affects the hue of the material based on the metallic map values, targeting only the metal parts of the material.
Metal Lightness: This parameter controls the lightness of the metal color. It ranges from 0 to 2, with 1 being the default value.
Non-Metal Colour: Choose a color from the color wheel to adjust the hue of the material based on the non-metallic map values, affecting only the non-metal parts of the material.
Non-Metal Lightness: This parameter controls the lightness of the non-metal color. It ranges from 0 to 2, with 1 being the default value.
AO Map Strength: Adjusting this parameter controls the intensity of an ambient occlusion (AO) map, if detected.
Material
Metallic-ness: This parameter adjusts the metallic values in the shader. Set it to 0 to make metal areas non-metallic, or set it between 0.5 and 1 to make non-metallic materials more metallic.
Roughness: Adjusting this parameter controls the roughness of the shader based on the roughness map applied. It ranges from 0 to 1, with 0.5 being the default value. Lower values result in a glossier appearance, while higher values make the material rougher.
Specular: This parameter controls the intensity of the specular highlight. Adjusting it changes the shininess of the material.
Sheen: This parameter adjusts the sheen effect on the material. Higher values increase the intensity of the sheen.
Anisotropic: Enabling this option activates the anisotropic value in the shader, which produces an anisotropic reflection effect. For more information, refer to the additional documentation.
Anisotropic Rotation: This parameter controls the rotation angle of the anisotropic reflections.
Metal Spots: Adjusting this parameter affects the visibility of metal areas based on the metallic map. It becomes more noticeable when roughness or rough/shiny spot values are adjusted. If the metallic map is pure black and white without a range, this parameter has no effect.
Non-Metal Spots: Similar to the previous parameter, this parameter affects the visibility of non-metal masked sections of the metallic map.
Shiny Spots: This parameter affects the black-clip of the roughness map. Higher values make the black levels of the map more apparent, creating patches of higher gloss areas. Higher values may darken the entire map, resulting in a glossier appearance. The value range is from 0 to 1.
Rough Spots: This parameter affects the white-clip of the roughness map. Higher values make the white levels of the map more apparent, creating patches of higher rough areas. Higher values may lighten the entire map, resulting in a rougher appearance. The value range is from 0 to 1.
Emission
Emission Strength: Adjusting this parameter determines the strength of the emission effect. Higher values result in a brighter emission, while lower values create a dimmer emission.
Emission Mask Range: This parameter determines the range of the emission mask. Adjusting the value expands or contracts the range of the mask.
Emission Mask Falloff: Changing this parameter controls the falloff of the emission mask. Higher values result in a smoother transition between masked and unmasked areas.
(1).gif)
.gif)
Emission Mask Preview
Texture Data
Enable Opacity Mask: Enabling this option ensures that any materials with an alpha mask have the mask applied, allowing for transparent sections in the material.
DX to OGL Normals: By default, this parameter is set to 0. Enabling it flips the Green channel of a normal map to convert normal maps between Direct X (DX) and OpenGL (OGL) formats. Use this option if your shadows appear incorrect or if you know the specific format of the normal map.
Surface Properties
Normal Map Strength: This parameter controls the intensity of the normal map effect. The default value is 1, and it ranges from 0 to 10. Manual input of values outside this range is possible, but it may lead to unexpected results.
Bump Strength: Adjusting this parameter determines the strength of the bump or height map effect. It is a value between 0 and 1, where higher values create more pronounced bumps.
Bump Distance: This parameter adjusts the perceived height of the bump map. It is recommended to set the bump strength to 1 and adjust the intensity using this value. The units correspond to your scene's scale, such as Blender units. For example, a value of 0.25 would be equivalent to a 2.5cm height. The range is limited to 5, but you can manually enter any value. Negative numbers can be used to invert the bump effect.
Displacement Scale: This parameter controls the strength of the displacement map. The displacement intensity matches the bump map, where a value of 0.25 corresponds to a 2.5cm displacement.
Displacement Midlevel: Adjusting this parameter offsets the starting point of the displacement effect. Higher values make the displaced mesh move inward from its original volume, while lower values make it move outward from its original volume.
Mapping
Rotate Texture: This parameter enables you to rotate the textures along their mapped coordinates. The values represent rotation angles in degrees, where 90 degrees corresponds to a quarter turn.
Scale Textures Up: Enabling this option scales up the textures, making them appear larger.
X Location: This parameter moves the mapped texture along the X axis.
Y Location: This parameter moves the mapped texture along the Y axis.
Z Location (Only works with Tri-Planar): This parameter moves the mapped texture along the Z axis. Note that this option is available only when Tri-Planar mapping is enabled, as UV maps do not have a Z axis.
Scale X: Adjusting this parameter scales the textures along the X axis. Higher values result in more repetitions of the texture in that direction.
Scale Y: Adjusting this parameter scales the textures along the Y axis. Higher values result in more repetitions of the texture in that direction.
Scale Z (Only works with Tri-Planar): This parameter scales the textures along the Z axis. Note that this option is available only when Tri-Planar mapping is enabled
Make Texture Smaller: Increasing this value increases the number of tiles generated, making the texture appear smaller as it scales down to accommodate more tiles in the same mapping coordinates. This setting affects all previous mapping settings.
Mapping Modes
Tri-Planar Mapping: Enabling this option swaps from UV mapping to a projected procedural mapping system. Tri-Planar mapping maps directly to the XY and Z coordinates of a mesh. It is useful for reducing texture stretching on objects with high-sloping faces.
Seam Blending (Only for Tri-Planar): Enabling this option blurs the visible seams from the Tri-Planar mapping system. However, note that enabling seam blending can cause artifacts when using adaptive displacement.