Geometry Blending
By default, each layer is positioned directly on top of the previous layer. In this section, you have the flexibility to determine which elements from the layer beneath should be visible and how they should be blended with the current layer.
Base Settings
Mix Factor
This setting determines the extent to which this layer's influence is applied. A value of 1.0 represents the full amount, while a value of 0.0 indicates no influence from this layer.
Math
Use Math
By enabling this toggle, the active math operation is applied to merge this layer with the preceding layers. You may experiment with options such as Smooth Maximum or Smooth Minimum to observe the effects.
Displacement Type
Change the direction your layer is displaced.
- Z Axis: Displace the terrain straight up and down
- Normal: Displace the terrain along the normals as resulted from the previous layers
Only visible when Use Math is enabled.
Operation
The math operation when combining the previous layers with this layer.
See Blender's manual for operation explanations:
Float Math (Displacement Type: Z Axis)
Vector Math (Displacement Type: Normal)
Only visible when Use Math is enabled.
Note: Not all math operations will be actually useful for layer combining
Switch
Activating this function will interchange the current layer with the preceding layers in the math operation.
Only visible when Use Math is enabled.
Note: Swapping does not influence certain math operations. For instance, operations like Subtract, Divide, and Power are examples where swapping has a significant impact on the outcome.
Blending Masks List
Within this section, you can stack masks to provide True-Terrain with precise instructions regarding the specific location and manner in which you want this layer to be applied. Masks are applied in a top-down manner, with the base mask positioned at the top. Subsequently, additional masks are applied accordingly, following a similar approach to Blender's Modifier section. You can always determine where the top of a list is based on where a new item is added, either at the top or bottom, which provides a clear reference point for the order of application.
Settings
Add Modifier
By clicking the [+] icon located at the top right corner, a menu will be revealed, offering options to select the desired mask for use.
Remove Modifier
Remove the active item.
Move Item Up/Down
This function allows you to reposition the active item either upward or downward in the list. However, it's worth noting that the respective button will be disabled if the active item is the first, last, or the only item in the list, preventing any undesired actions.
Reset Modifier Types
Occasionally, after updating True-Terrain and accessing files created with earlier versions of True-Terrain 5, modifiers might exhibit an identity crisis, incorrectly presenting themselves as masks they are not. In such cases, the function available in the dropdown menu, situated between the Move Up and Remove Mask buttons, will rectify the situation. It will effectively administer the appropriate adjustments to all masks, restoring their correct attributes and restoring proper functionality.
Blending Masks
Base Mask Settings

Opacity
The extent of influence a mask has on the final output. It determines the strength or intensity of the mask's effect on the overall result. By adjusting the opactiy, you can control how much the mask contributes to the final output of the process.
Invert
Swap the values of a mask. In this operation, the original values that are set to 0 will now become 1, and vice versa. This results in an inverted representation of the mask, effectively flipping its influence on the output.
Add
Enabling the "Add" option will incorporate this mask's effect to the previous masks, effectively adding its influence to the cumulative result. On the other hand, when the "Add" option is disabled, this mask's effect will be subtracted from the cumulative effect of the previous masks.
In the given scenario with two height masks, by default, the combined result will display areas that are white (1) in both masks. In other words, the intersection of the two masks determines the visible areas.
However, if the "Add" option is enabled, the resulting combination will behave differently. Instead of using the intersection of the masks, the "Add" option treats the masks as additive factors. If an area is white (1) in the current layer, it will remain white when combined with the previous masks, regardless of their values in that specific area. This approach is akin to addition, where 0 + 1 equals 1.
For the topmost layer (no previous layer), enabling "Add" will lead to all areas becoming white (1) since there are no previous masks to affect the outcome.

Reset Value to Default
This button allows you to reset the value associated with it to its default state, which corresponds to the value it had when originally added. Selecting this option will restore the button's setting to its initial configuration.
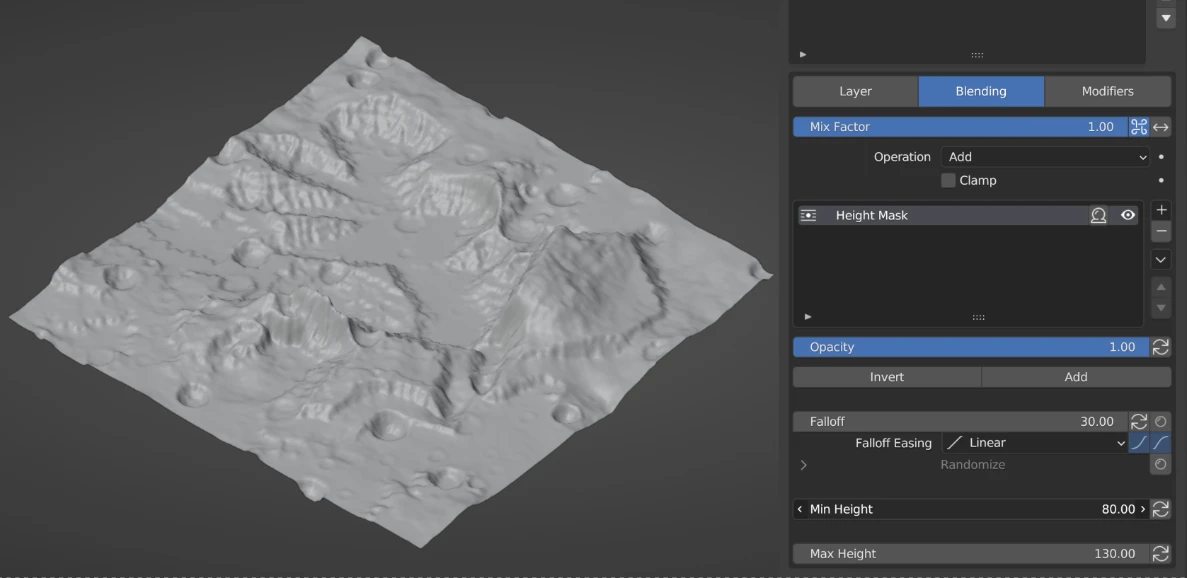
Falloff Easing
Randomize
Distance Mask
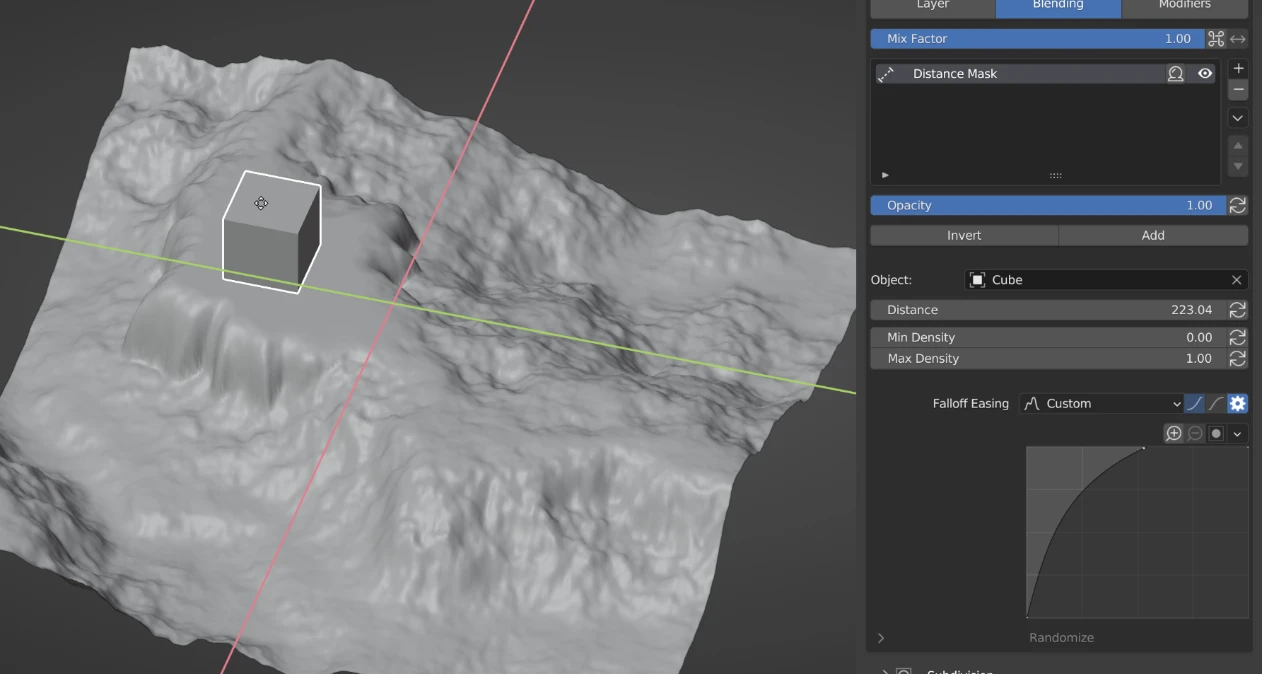
Use the distance from an object to mask the current layer
Object
Select the desired object that will serve as the center of the distance mask, where the values will be set to 1.0. This selected object will act as the focal point for the distance mask, with its associated values set to 1.0.
Distance
How far out to fade out
Min Density
The multiplier at the end of distance and to eternity. This effectively lets in more of the previous layers
Max Density
This multiplier at the object.
Height
Split Falloff
Use different falloff values for minimum and maximum
Split Randomize
Use different radomize settings for minimum and maximum
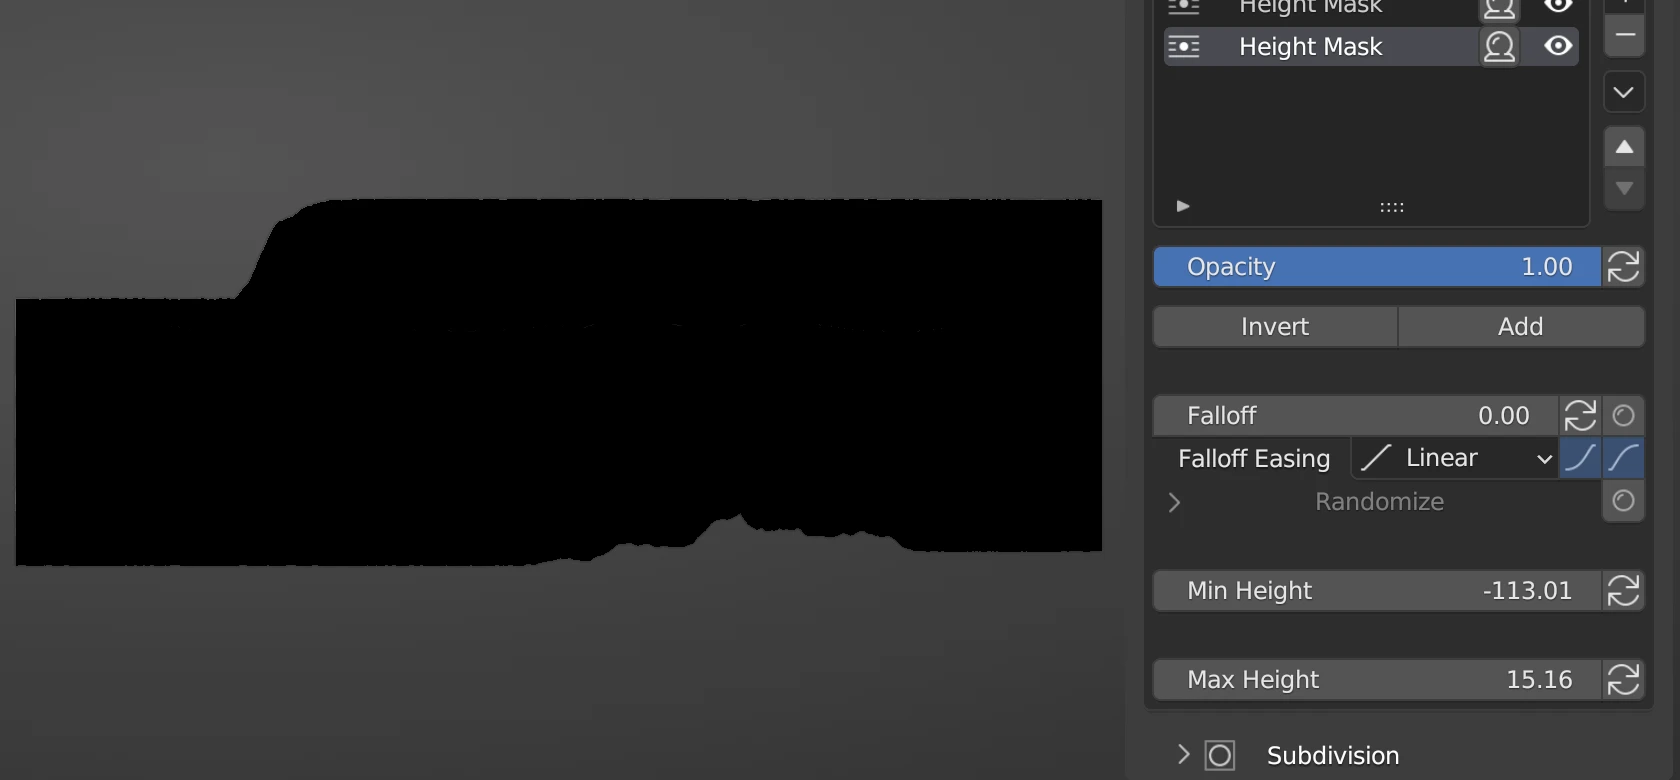
Min Height
The lower limit of the mask
Max Height
The upper limit of the mask
Normal
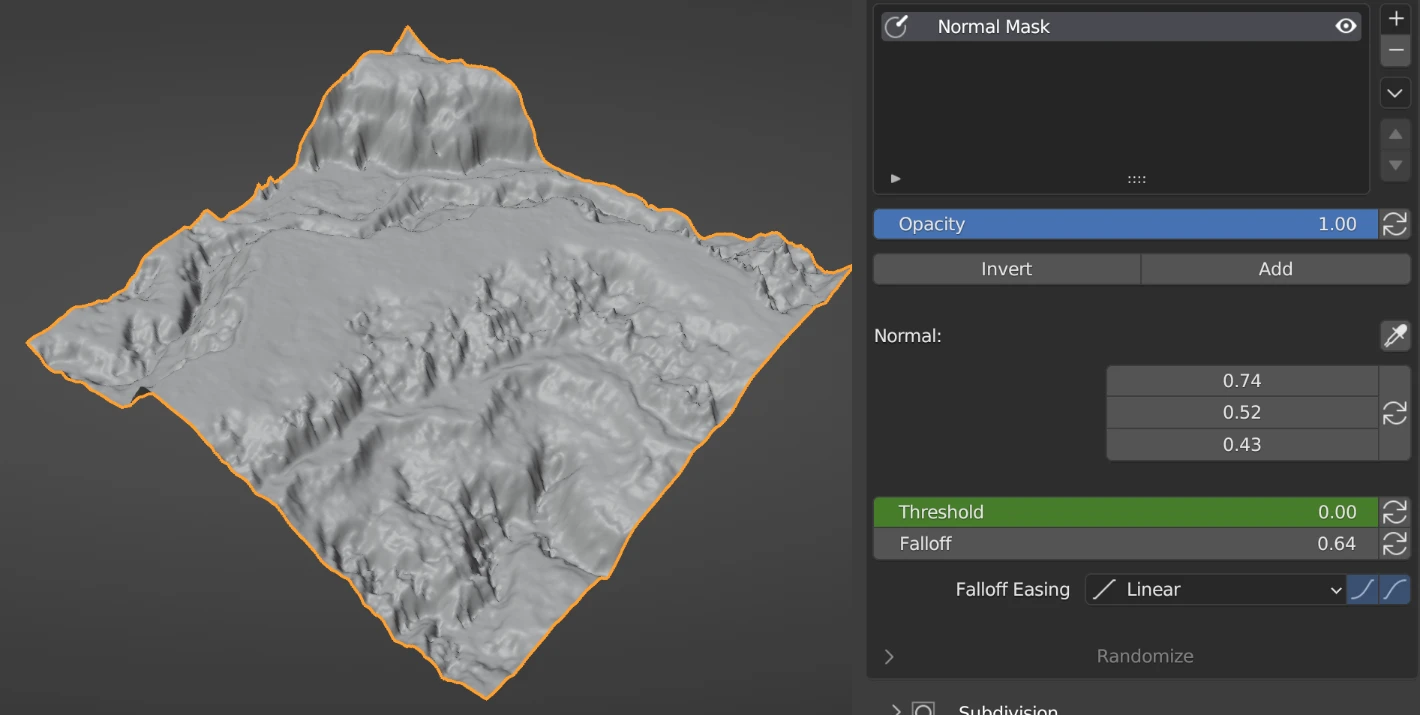
Normal Picker
Choose a normal by clicking on a place on the terrain
Target
The normal vector that is being targeted.
Threshold
Permits vectors that are in proximity to the designated "Target" to be included as well.
Slope
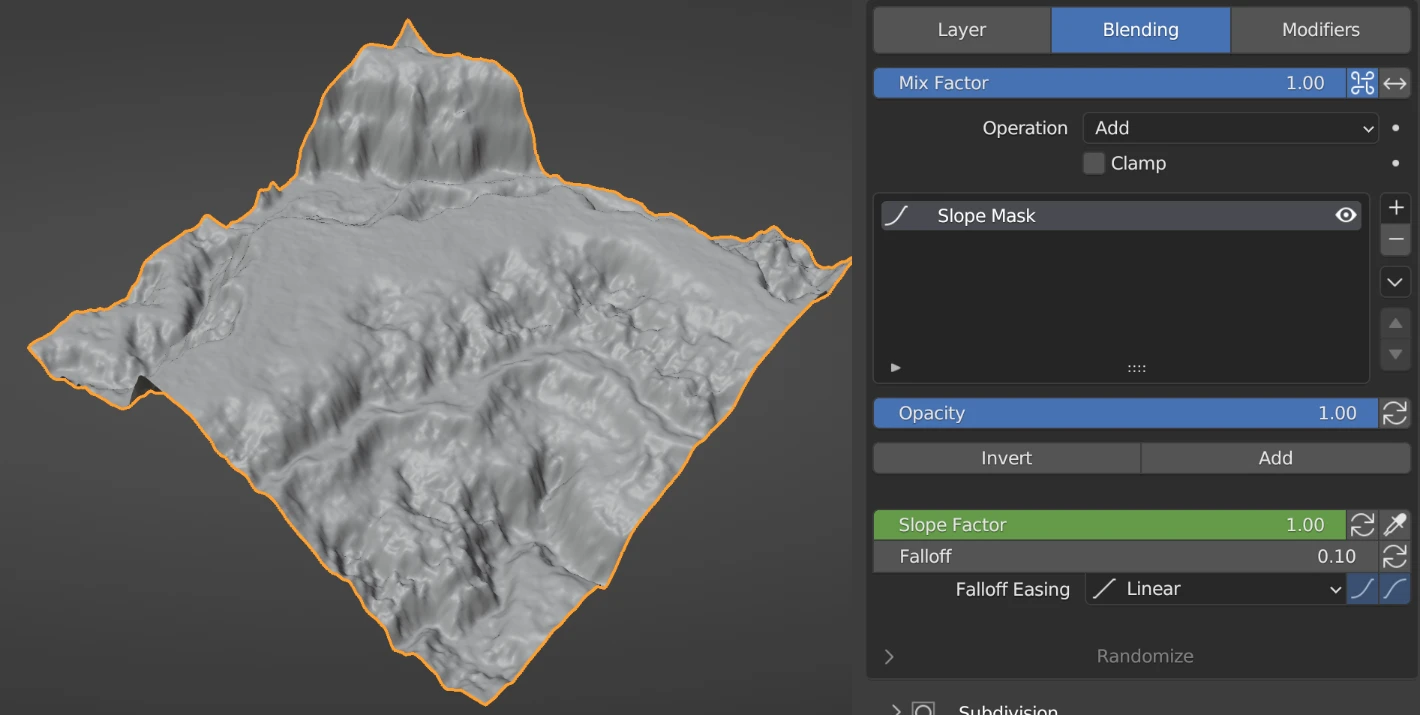
Slope Factor
The extent of incline that is incorporated into the mask. A value of 0 signifies that no slope is included, encompassing areas that are flat and parallel to the ground. On the other hand, a value of 1 implies that slopes up to and including 90-degree cliffs are considered and included in the mask.
Texture

Use a texture to blend between the current layer and previous layers.
Texture Type
The type of texture to use
Pick From RGB
Many texture types output a color. With this enabled you can choose what channel of the color to use as the blend mask. Otherwise the single value output is used or the color is averaged if there isn't a single value output available.
R/G/B
The rgb channel to use for blending of the active texture
Mapping
Use either the position of the vertices or the object's UV Map to place the texture.
UV Type
Texture Settings
The setting of the active texture. See Blender Docs for more information.
Remap Values
To alter the range of values for this mask, you can employ various methods:
- Map Range: Utilize From Min/Max and To Min/Max values to modify the range of the mask's values. This method allows you to remap the existing range to a new range.
- Easing: Employ predefined curves or create a custom curve to adjust the range of values. Easing functions enable you to control the smoothness or sharpness of the transition between values.
- Ramp: Use a ramp to manipulate the range of values. By configuring the ramp's control points, you can reshape the mask's values to suit your requirements.
Transform
Reposition, resize, or rotate the active texture
Blur
The Blur mask is more of a modifier to the masks than a mask itself. It does not add or remove anything to the mask but instead blurs the values as they exist up to this point in the stack.
Iterations
The number of repitions to mix values with neighbors
Weight
Effectively the amount of blur.
Remap Values
The Remap Values mask is more of a modifier to the masks than a mask itself. It does not add or remove anything to the mask but instead edits the values as they exist up to this point in the stack.
This mask modifer edits the values in 3 possible ways:
- Map Range: Utilize From Min/Max and To Min/Max values to modify the range of the mask's values. This method allows you to remap the existing range to a new range.
- Easing: Employ predefined curves or create a custom curve to adjust the range of values. Easing functions enable you to control the smoothness or sharpness of the transition between values.
- Ramp: Use a ramp to manipulate the range of values. By configuring the ramp's control points, you can reshape the mask's values to suit your requirements.
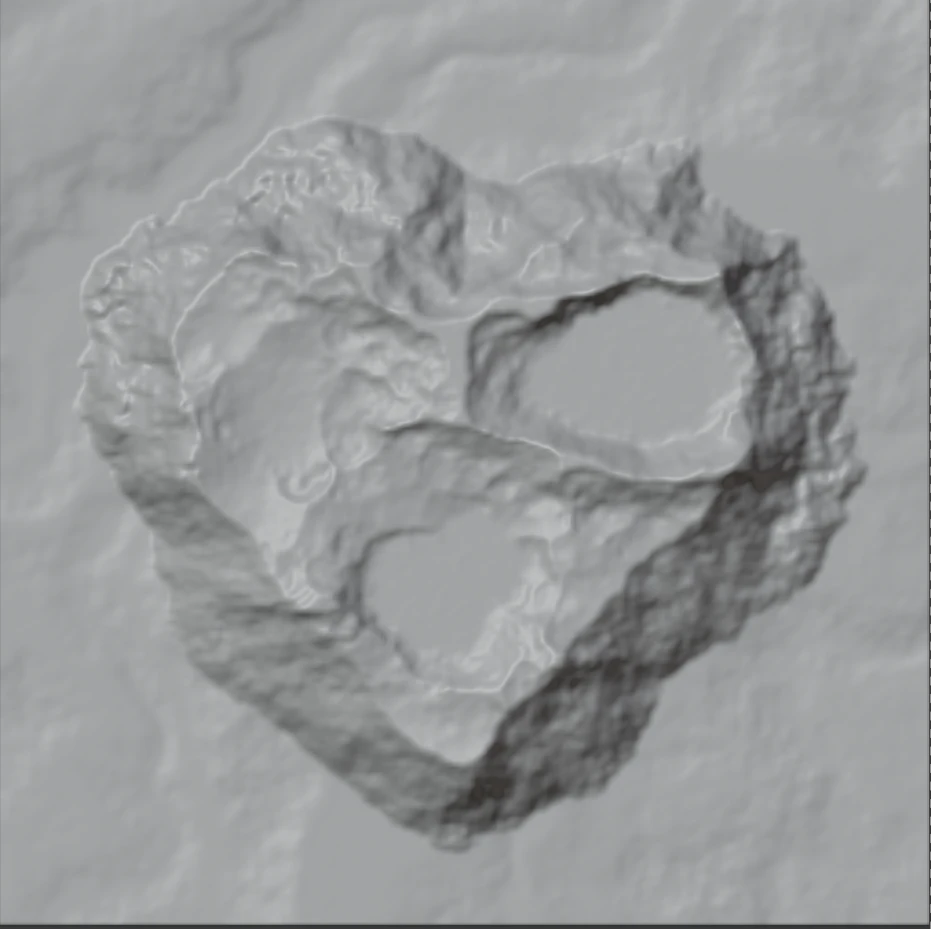
Valley
The valley mask feature grants users the ability to focus on either valleys, which are concave areas, or ridges, which are convex areas. With this functionality, users can selectively identify and manipulate these specific topographical characteristics within the terrain.
Threshold
Adjust the level of inclusiveness to target areas that are progressively less concave or convex.
Use Ridges
Target areas that are convex or ridges
Falloff
The distance from the fully selected areas under the threshold to where the mask selection gradually fades out.
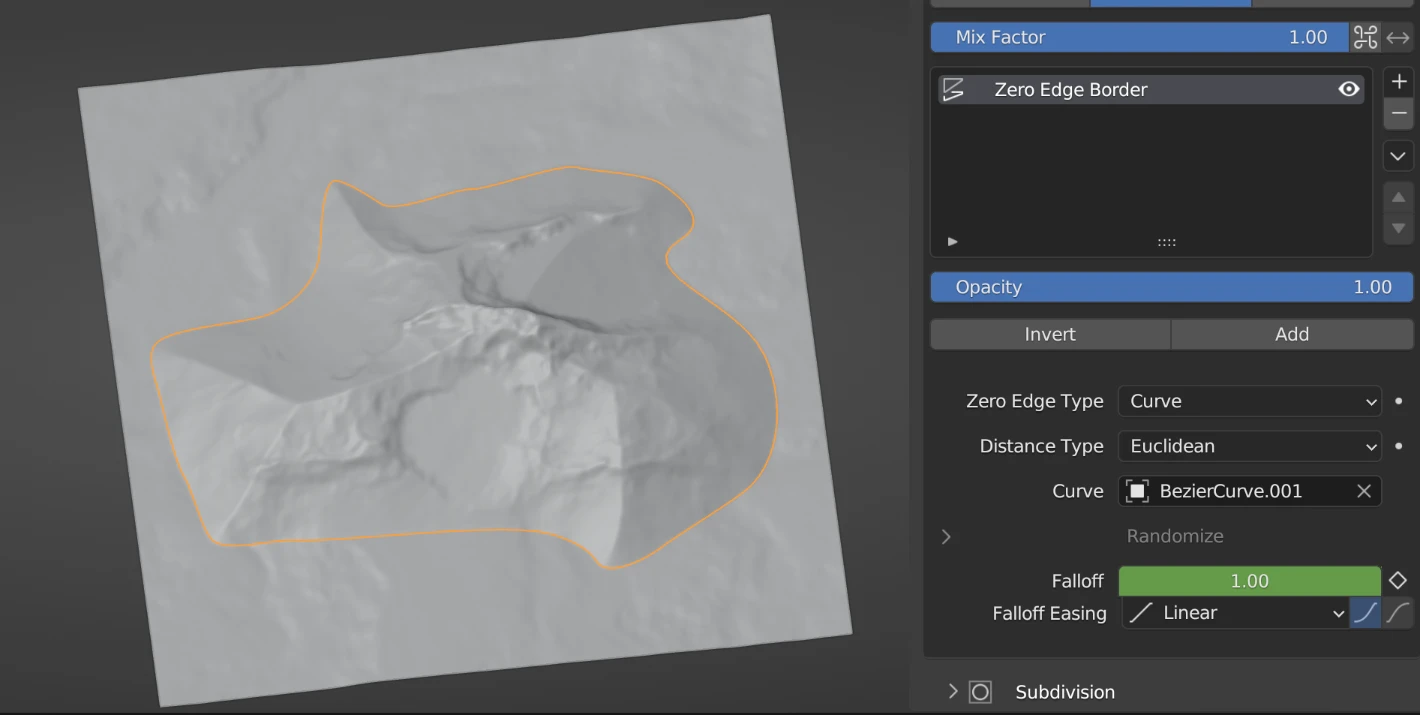
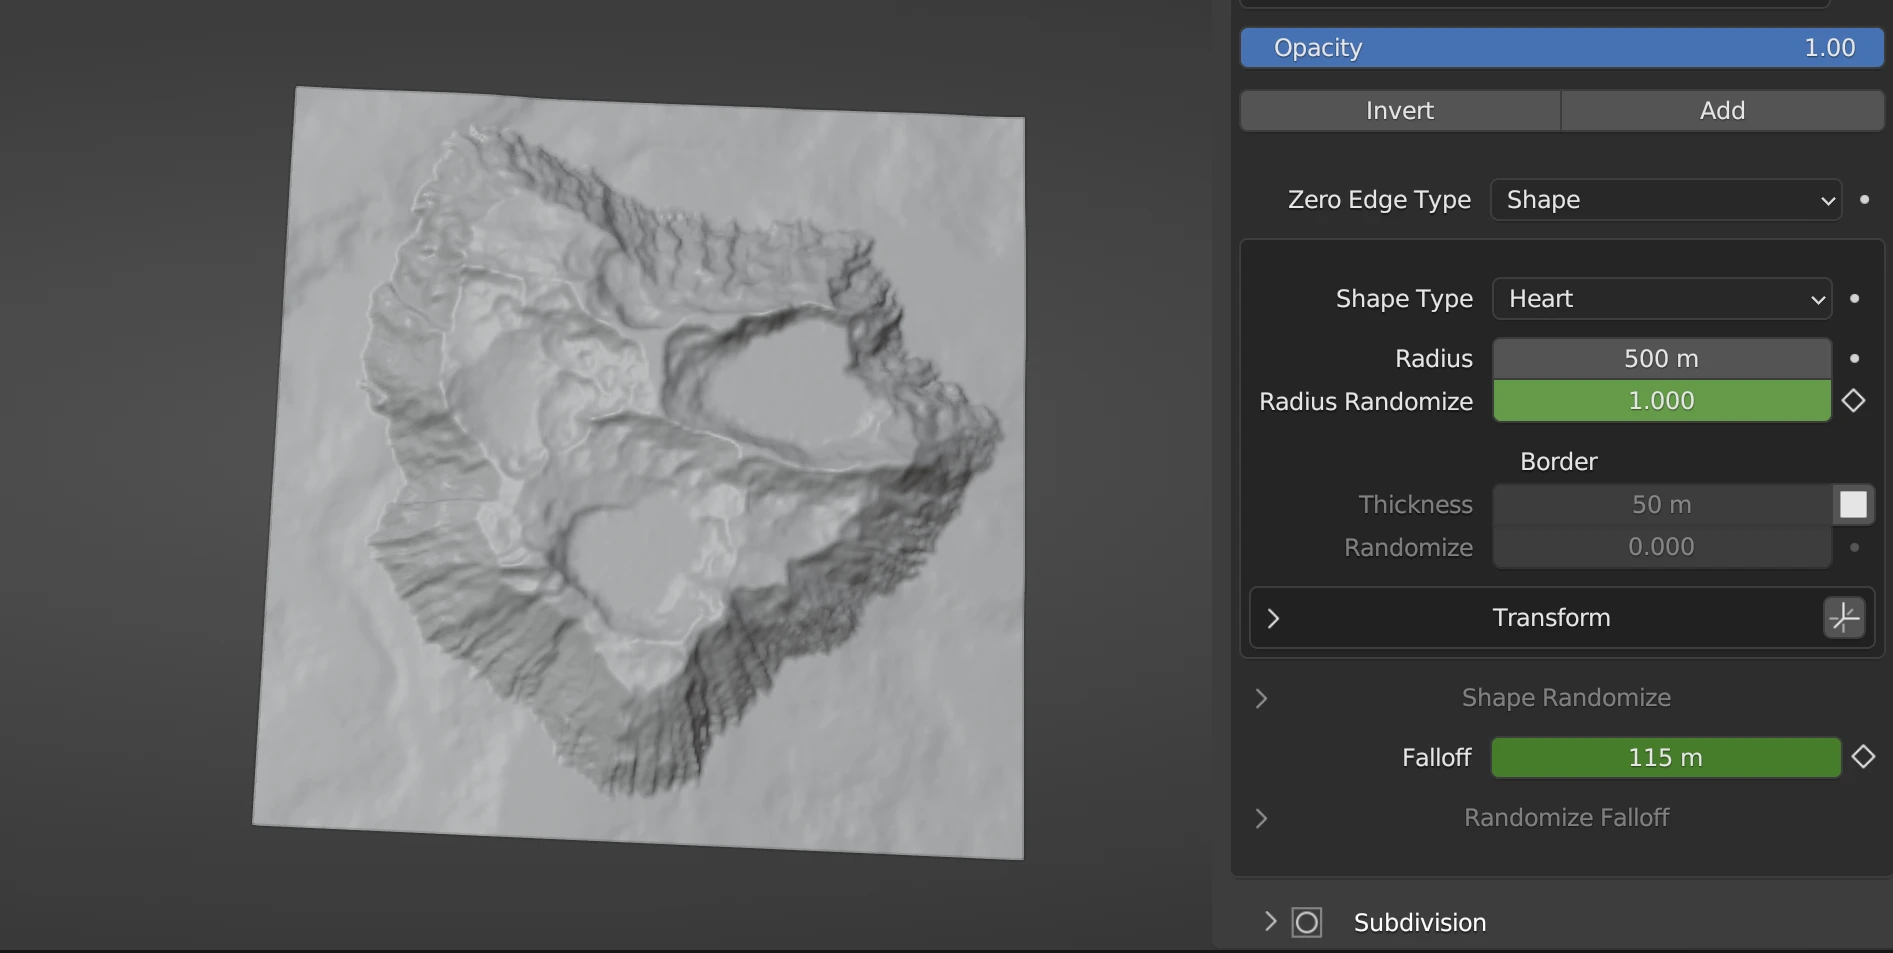
Zero Edge Border
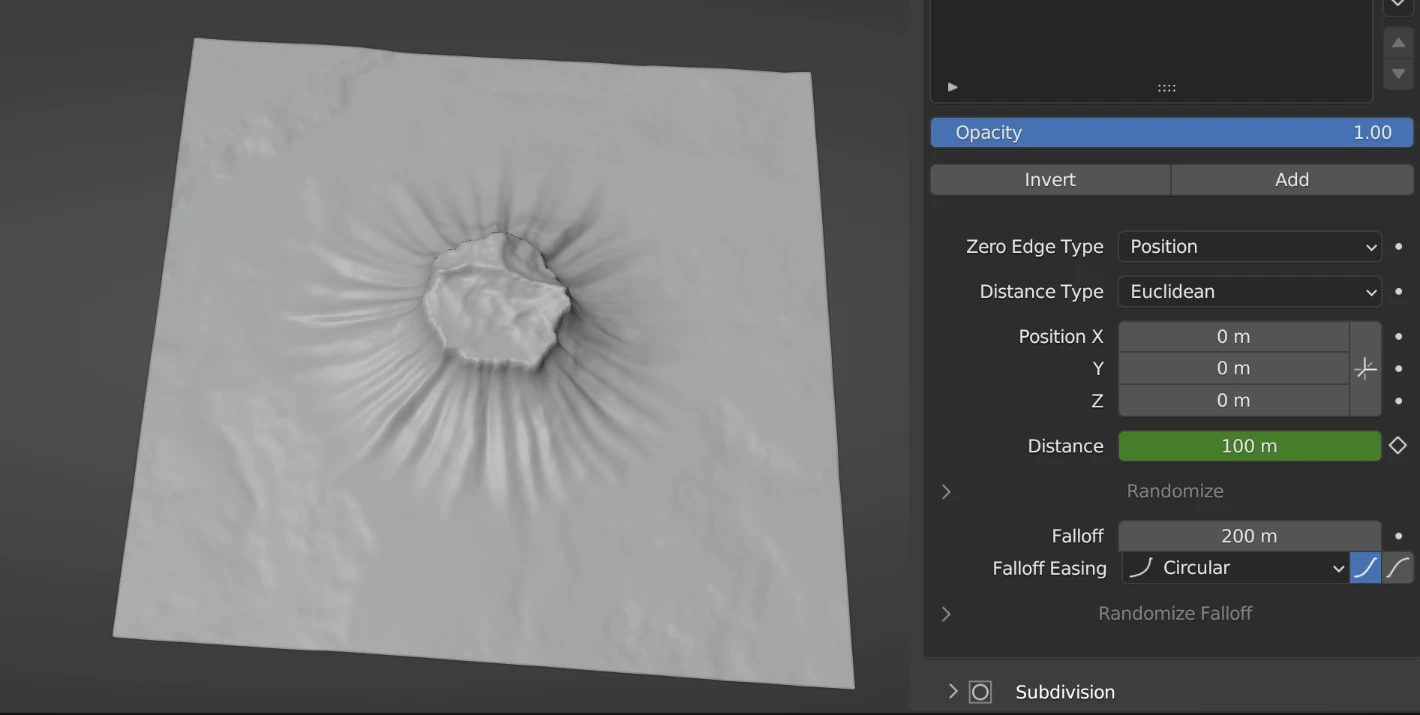
This mask aids in establishing concealed boundaries between layers. It sets the height of the relevant layer to 0 at the edge of the combined Distance and Falloff settings.
Zero Edge Type
Position: Use the distance from a position relative the object's/layer's position. (see main image for example)
Curve: Use a curve to define the edge or border of the zero edge border
Shape: Use a predefined shape to define the border
Distance Type
How to calculate the distance to the zero edge. Useful for things like heightmaps where you may want to use a more square like falloff. Position and Curve Edge Type Only
- Euclidean - Equally measures along all axes, adhering to the typical distance algorithm. This results in a round falloff pattern.
- Manhattan - Measures along only one axis at a time, generating a diamond or rotated square-like falloff pattern.
- Chebychev - Measures along the largest difference among the axes, leading to a square-like falloff pattern.
- Minkowski - Measures along all axes similar to Euclidean, with the option to adjust the exponent. This yields various shapes for the falloff, ranging from a star-like pattern (exponent < 2) to a circular one (exponent = 2, similar to Euclidean), and finally to a rounded square (exponent > 2).
Exponent
The exponent that changes the shape of the minkowski distance result. Minkowski Distance Type Only
- < 2: star-like pattern
- = 2: circular pattern, similar to Euclidean
- > 2: rounded square
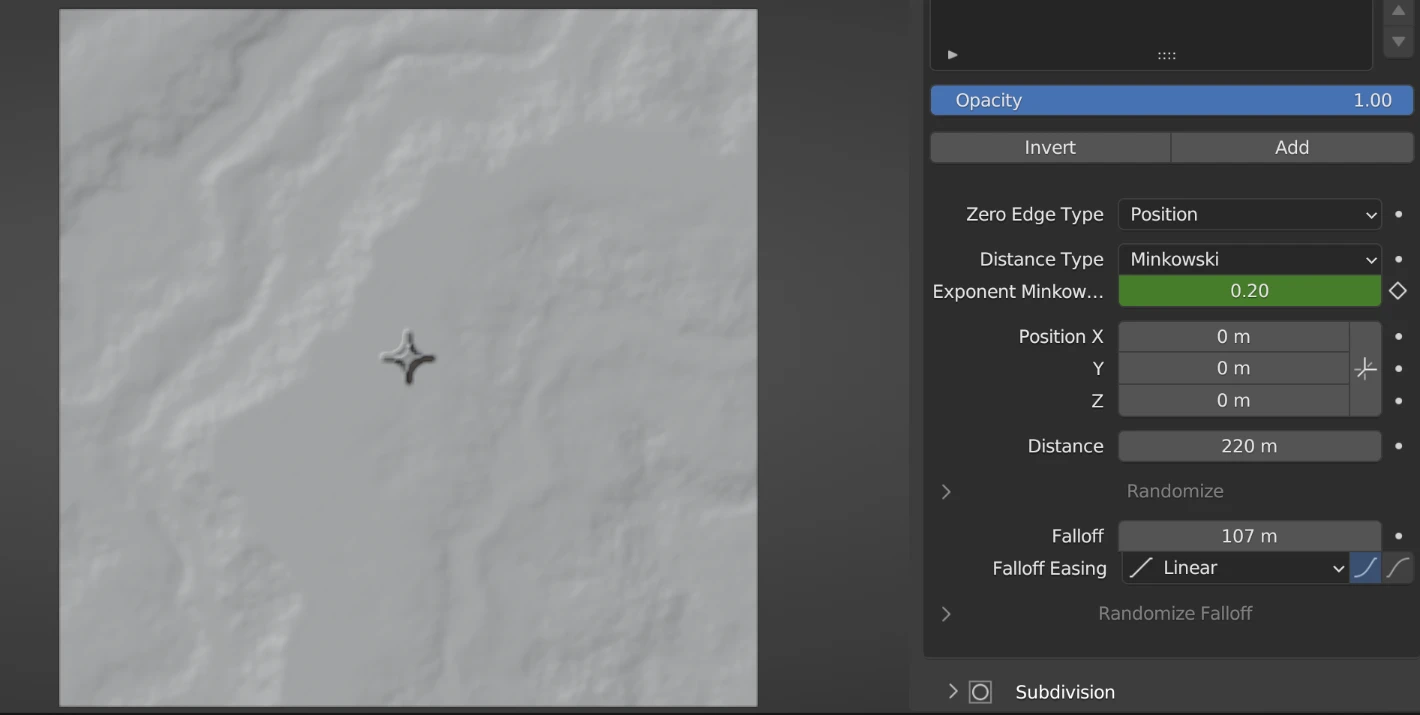
Position
The center of the mask. Position Edge Type Only
Use Layer Transform
Have the Zero Edge Mask lock to the transform of its layer. Position and Shape Edge Type Only
Distance
How far away from the Position to include at full height. Position Edge Type Only
Curve
The curve object to use to define the edge. Curve Edge Type Only
Shape Type
Choose from many different shapes to define the look of the border. Shape Edge Type Only
Falloff
How far away from the area(s) that are fully included in the mask to fade out from full height to zero height.
General Shape Settings
Roundness
Most shapes have this setting which allows the user to round off the corners of the shape
Use Border
Convert the shape into an outline
Border Thickness
How thick the border is
Border Randomize
How much the Shape Randomize settings affect the border (may need to go higher than 1.0)
Transform Settings
Move the shape around with option for it being relevant to the layer's transform settings
Shape Randomize
These settings introduce randomization to the primary shape, which corresponds to the area that is at full height.
In order to incorporate randomization to the shape, the Randomize setting within the shape settings must have a value greater than 0. Depending on the specific scenario, this value may correspond to a single setting such as "Radius Randomize." Alternatively, there may be a setting labeled "Whole Randomize" along with a toggle option labeled "Split Randomize."
When the "Split Randomize" toggle is enabled, individual settings can be randomized independently (e.g., 'Width Randomize' and 'Height Randomize' on the box shape). Conversely, when the toggle is disabled, all settings will receive the same degree of randomization. This flexibility enables users to apply randomness selectively to tailor the shape's appearance according to their preferences.