

First Time Use
This is a pre-alpha build
Please keep this in mind as things may break, or not work as intended.
The Side Panel
Basic
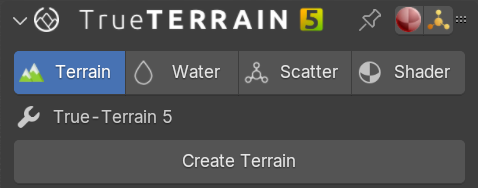
The N panel is where you will find all the (current) main functions of True-Terrain 5.x. Across the top of the panel we have tabs for Terrain, Water, Scatter, and Shader. These tabs will be your main working spaces and will control functions respective to the system you're using. For example Terrain will only control the manipulation of the object/mesh that has been created.
Terrain Tab
Terrain
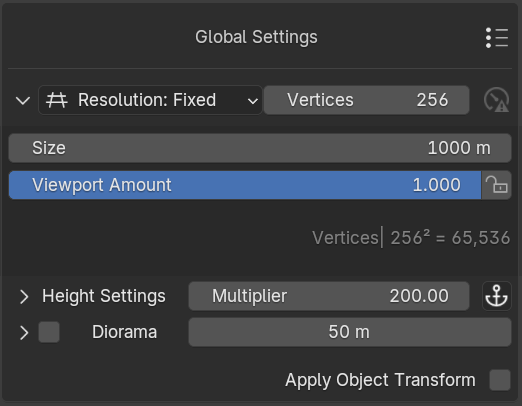
Terrain will be the first system you use. After clicking the [Create Terrain] button you will have at your desposal a 256x256 grid with 65,536 faces by default, which is ideal for real-time control and showing details. To adjust your grid, go to the Global Settings section. If you select Density, you can set the resolution instead of the vertex count, this is best used if you wish for the detail to stay the same when you increase the size of the mesh. If you choose Fixed, the vertex count stays the same no matter the mesh size, which could affect quality for larger meshes. The size of the default mesh is set to 1000m (1km). This is inline with other terrain generation tools like GaeaTM and World CreatorTM and should provide more than enough real-estate for you to begin making creations. You can always adjust this value, and any adjustments you have made to the mesh will be relative. Height Multiplier should be used more as a "post" effect adjustment. This will scale the overall height of the entire mesh, layers and modifiers included. This can make your mesh look stretched or squashed if you have already added layers.
Layers
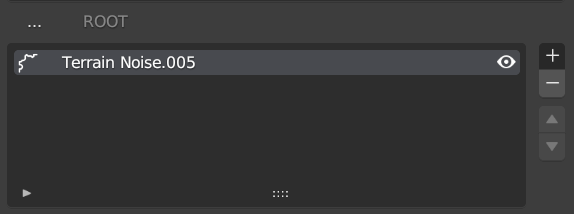
Layers are shown in the middle of this tab. Layers will be named based on their type:
- 'Terrain Noise' is a noise type layer
- 'Terrain Image' is a heightmap layer
- 'Terrain Group' is a group layer, which can contain other layers
The [+] will add a new layer type from your choosing.
The [-] will remove the highlighted layer.
the [▲] [▼] will move layer types above, or below the layer respective layers around them.
See the Layers page for more information.
Manipulation
The lower section of the Geometry UI is where you can find the functions for manipulating the terrain. Layer houses the core functions of terrain manipulation. You will be able to change the location, rotation and scale of the layer here. If you are using noise, then this will have infinite details. If you are using a heightmap, you can move the heightmap off the mesh if you move it too far. You can also adjust the sub-noise details in this tab.Blending houses the functions of the layer. Here you can control how much the current layer shows through any previous layers, you can choose whether the layer will "clip" the previous layer, or swap to a math function to blend with the previous layer. Modifiers is where you can add layer modifiers which will adjust how the layer is displayed, and how it affects the current geometry.
We have a video (it's not short) going over all the new features
This is a "quick" walkthrough of the features so far. This is less of a follow-along video where we make something, and more of a case of showing you what we can in the quickest way possible. We will have more videos coming soon...
In True-Terrain v5.0.0.42, we focused on improving performance, polishing the preferences system, and laying the groundwork for upcoming asset pack support.
We introduced the first step of our new asset system with multi-pack importing—you can now select and import multiple .tt_pack files at once. While official packs are still on the way, this update gets everything ready for when they drop.
To give you better visibility, we added version info to the panel, so you always know what you're working with. We also switched the default icon format to .webp, which offers smaller file sizes and alpha support. Icons are now optimized during import or when loading from previous installs, helping reduce load times and improve general performance. You’ll also now see the actual icon paths listed in the preferences, giving you more transparency over file management.
We aligned the Author tag to True-VFX standards, and made a bunch of small quality-of-life tweaks across the Preferences, including improvements to how the remove functions behave—so they now match what you'd naturally expect. On top of that, both Make Local and Load From Previous are now multi-threaded, which means faster performance when bringing in assets or preparing files. We even refined the progress bars to better reflect what’s happening under the hood.
Several bugs were fixed too. We stopped accidental overwrites of previews that caused ResourceWarning messages on unregistering, and we now show enum descriptions properly when adding layers or modifiers, giving you better feedback. We also resolved issues around image resizing, missing names on new items in preferences, broken folder paths when adding new icons, and misbehavior when moving active items up or down in the Preferences.
Finally, heightmap icons generated during import are now properly converted, so everything looks and loads the way it should.
This update sets the stage for future content packs, speeds things up across the board, and makes the preferences experience more predictable and user-friendly.
- Import Packs: Can select multiple .tt_pack files for importing (packs to come later)
- Added version info to panel
- Changed icon default extension to be '.webp'. Smaller file sizes and includes alpha channel. Users shouldn't notice anything different.
- When adding icons or importing from previous True-Terrain will now optimize icons to reduce loading times.
- Icon paths are now displayed in the addon preferences
- Author tag in addon now matches the True-VFX standard
- Misc consistency and small quality of life changes in the Preferences
- Various changes to the remove functions in the Preferences to better match the expected default behavior
- Make Local is now multi-threaded and should be much faster
- Load From Previous is now multi-threaded and should be much faster
- Small quality of life changes to progress bars
- Accidental overwrite of previews causing ResourceWarning when unregistering
- Display the enum description when adding layers/modifiers
- Images would throw error if resizing was not needed
- Possible speed ups when opening Blender/registering addon
- Ensure name is given when adding new items in the preferences
- Ensure destination folder exists when adding a new icon
- Ensure the correct property when moving the active item up and down in the Preferences
- Heightmap icons being generated from the heightmaps upon import weren't converting correctly
We fixed some... Oopsies!
- Compatibility stuff with Macs
- Accidentally commented out the stuff that installs updates in Install Updates
In True-Terrain v5.0.0.40, we introduced a powerful new blending tool and continued refining the system for a more intuitive and streamlined experience.
The highlight of this release is the new Layer Range Mask, which lets you use height data from either the current or previous layers to control how the current layer blends with the next one. This gives you precise control over where a layer appears, while preserving the underlying terrain detail.
Within the Layer Range Mask, you can choose between using the current or previous layer's height data, and clamp the influence between specific value ranges using the new From Min, From Max, To Min, and To Max controls. You can also make these ranges relative to the minimum and maximum values of the source layer, which makes it much easier to remap the full height range with minimal effort. At a value of 0.0, the mask uses the previous layer; at 1.0, it uses the current one—giving you smooth, intuitive control.
To support this new system, we renamed the "Data" tab in the terrain settings to "Layer", and improved the tab descriptions throughout to better explain what each one is for. We also moved the tweaking and blending settings into the new Layer Range Mask, keeping everything tied to blending in one place for better clarity.
To clean up the UI, math options in the Blending tab will now only show if "Use Math" is enabled, and we filled in some missing features—Invert and Add settings are now available for the Zero Edge Border mask, and its default values now better reflect the default 1000m terrain size.
We also tackled a few fixes: no more ‘WARN’ messages at startup, and we added the missing “Use Ridges” setting in the Valley Mask presets, along with proper descriptions for those settings so you always know what you're working with.
This update gives you smarter blending, cleaner UI organization, and a more robust toolkit for layering your terrain exactly the way you want it.
- Layer Range Mask: Use the height data from the current layer or the previous layers to blend the current layer with the next layer. This is useful for putting the current layer at specific places while keeping underlying details.
- Previous Layer | Current Layer: Choose to use the height data from the previous layer or the current layer as the source for this mask.
- Clamp: Clamp the values to the To Min and To Max values.
- From Min | From Max: The range of values to use from the source layer.
- Use Min | Use Max: Make the From Min and From Max values relative to the the minimum and maximum values from the source. The From Min and From Max values will then add to the minimum/maximum value. Good for easily getting the whole height range of the source layer into the To values.
- To Min | To Max: The range of values to map the from values to. 0.0 will result in the previous layers values, 1.0 will result in the current layers values.
- The Data terrain settings tab is now called Layer
- The terrain settings tabs now have better descriptions of what they display
- Moved Tweaking settings and their respective blending options to the new Layer Range mask (see above)
- Only display math options in Blending tab if Use Math is enabled
- Add in missing Invert and Add settings for Zero Edge Border mask
- Set the default values of the Zero Edge Border mask to ones consistent with the default terrain size being 1000m
- No more annoying
'WARN'messages on start up - Added in missing Use Ridges setting in the Valley Mask's presets
- Added in missing descriptions to the Valley Mask's preset settings
In True-Terrain v5.0.0.39, we expanded the terrain system with powerful new modifiers, a handy gizmo, and a few key changes to improve clarity in the workflow.
Terrain Noise layers now have their own transform gizmo, just like Height Map layers! The difference is that this gizmo always resets to the center of the terrain object. This way, even if you move the noise layer around, you won’t lose track of the gizmo—perfect for keeping things manageable when working with large terrains.
We also introduced several new terrain modifiers. The Terrain Blur Mask Modifier, found in the Blending tab, allows you to blur the mask values from previous layers, helping you smooth transitions between effects. The Terrain Blur Modifier (under the Modifiers tab) lets you blur the geometry itself, with options to affect just the Z axis or all axes. And with the new Terrain Inflate/Deflate Modifier, you can expand terrain shapes for softer features or contract them to create sharper, more dramatic formations.
To better reflect the intended workflow, we changed the default tab in the sidebar to Geometry instead of Shader, since that’s usually where your terrain-building process begins.
We also reorganized how masks are handled. What used to be called “Masks” under the Modifiers tab are now properly placed in the Blending tab, since they’ve always influenced blending—not terrain shape. At the same time, we clarified the distinction between masks and mask modifiers for both shading and geometry. For example, "Remap Values" was moved to the "Mask Modifiers" section, as it modifies incoming mask data rather than functioning as a mask on its own.
To prevent unexpected results, we added a warning when attempting to bake shader maps on terrains that use geometry nodes, since those can generate geometry the baker can’t always see.
Finally, we corrected icons for several mask types, including Texture, Valley, and Remap Values, so your UI now better reflects what you’re working with.
This update gives you more control and flexibility over terrain shaping while continuing to refine the user experience and interface logic for a smoother workflow.
- Terrain Noise layers now have a transform gizmo similar to Height Map layers! The only difference is that the gizmo resets to the center of the terrain object instead of staying with the layer. This is so that the gizmo doesn't get lost when you move the layer around as if you go exploring your gizmo may be quite far off the edge of the terrain unlike you would do with a height map layer.
- Terrain Blur Mask Modifier: Blurs values of the masks that came before. Found under the Blending tab.
- Terrain Modifiers: What once was going to be 'Filter's in the Modifiers tab now is just modifiers since 'Masks' are now over in the Blender tab.
- Terrain Blur Modifier: Blurs the terrain geometry. Can switch between blurring just the Z axis or all axes. Found under the Modifiers tab.
- Terrain Inflate/Deflate Modifier: Inflate the terrain geometry to create larger features or switch to 'Deflate' and create sharp features. Found under the Modifiers tab.
- Default tab in the side panel is now the Geometry tab instead of the Shader tab as the workflow should typically start with the Geometry tab.
- Added a warning when attempting to bake out shader maps when a geometry nodes modifier is on the terrain object. Geometry nodes can create geometry that the baker doesn't see and may result in unexpected bakes.
- Moved what was previously called Masks in the Modifiers tab to the Blending tab for terrain layers. This is because the masks have always been used for blending and not for modifying the terrain's position data as might be expected when in the modifiers tab.
- Separate masks from mask modifiers for shading and geometry. Remap Values was the only one moved. Items in the "Mask Modifiers" section modify the mask data that comes from the layer before them. They aren't actually masks themselves.
- Masks Texture, Valley, and Remap Values had the wrong icons.
In True-Terrain v5.0.0.38, we brought back a key feature to improve visual detail and continued refining the update system and terrain workflow.
Height maps now automatically generate normal maps in the shader, giving your terrain extra surface detail and realism. When you add a height map layer, it’ll now include a corresponding normal map—and if you add a shader to a terrain that already has height maps, it’ll generate normal maps for those as well. These normal maps are also masked in line with their height map layers, so everything stays visually consistent.
We also improved the Install Update experience. Now when it finishes, you’ll get a popup prompting you to restart Blender, with buttons to do it right away or later—making the process clearer and more user-friendly. The installer now also targets the correct location more reliably, and if debug mode is on (which it is by default), you’ll see helpful info in the terminal to assist with troubleshooting if anything still goes wrong.
On the fix side, we resolved a bug where switching between textures could throw an error if the "from" texture had more quality levels than the "to" texture—especially when working at the highest level. That’s now fixed.
You can now create multiple terrain objects in the same scene, which gives you more flexibility in building complex environments. We also made sure that the auto zoom-out on terrain creation works even if the object is active but not selected, ensuring the viewport always frames your new terrain correctly.
Lastly, we fixed a bug where the strength of normal maps wasn’t being calculated properly, so now your terrain should display the intended level of bump and surface detail every time.
This update brings visual fidelity improvements and workflow polish to help you move faster and create with more precision.
- Added back in height maps as normal maps in the shader.
- Now when you add in a height map layer it will also add in a normal map if you have a shader on the terrain.
- Adding a shader to the terrain should add in all height maps currently on the terrain.
- Normal maps should be masked similarly to their respective height map layers.
'Install Update'now finishes with a popup that tells you to restart Blender and gives you buttons to close Blender now or wait until later.'Install Update'should install to the correct place now. Also, if Debug is enabled (as it is by default) a bunch of debug info is sent to the terminal window to help out if this still doesn't work.
- Switching textures errored out if the "to" texture has less quality levels than the "from" texture and the "from" texture was at the highest quality level.
- Allow multiple terrains to be created in the same scene.
- Zoom out on creation of terrain doesn't happen if object is active but not selected. Now the terrain object ensures it is selected and then zooms out.
- Normal maps 'Strength' was not being calculated correctly.
In True-Terrain v5.0.0.37, we focused on cleanup, refinement, and prepping the system for better long-term stability—especially around height maps and masking.
We removed several outdated settings from True-Terrain 4.x, including unnecessary height map preferences and the rarely used option to import settings based on image names. To improve clarity, we renamed the "Amount" setting under height maps to "Height Multiplier", making it more intuitive for you to adjust elevation strength.
A notable addition is the new option for parallel importing and converting entire directories of height maps, helping you work faster when bringing in large batches. You’ll find this toggle in the sidebar when selecting a folder to import.
We also made a deliberate choice to remove the Paint Mask option from terrain layers. Since Blender doesn’t currently support painting directly onto geometry nodes-based terrain, this feature wasn’t working as expected. We’ll revisit it once Blender adds attribute painting or similar functionality.
The tweaking system for layer blending has been improved, with a smarter combining algorithm. We flipped the "Previous" and "Current" tweak controls in the UI—now "Tweak Current" is the one you should adjust first, as it directly influences how "Tweak Previous" behaves. This change gives you more predictable and useful results when blending layers.
We also updated the Zero Edge Border (ZEB) mask shape defaults to better match the default terrain size of 1000m, and we tweaked some of the rounding algorithms for more consistent edge behavior. The randomize amount in ZEB masks now scales properly with radius and other settings, giving you better results when shaping terrain edges.
On the bug-fix front, we resolved an issue where converting EXR height maps into icons resulted in black previews, and we fixed problems with removing layers or modifiers that didn’t always work. We also addressed a bug where moving terrain layers up or down caused the terrain to disappear, and made layer visibility more reliable so what you see in the viewport now accurately reflects what’s active.
This update helps tighten the system, streamline the experience, and remove features that weren’t fully usable yet—making things cleaner and more stable for you moving forward.
- Removed unnecessary height map preferences settings leftover from True-Terrain 4.x
- Renamed height map preferences setting 'Amount' to 'Height Multiplier'
- Removed option for importing setting from height map image name (never really used it)
- Option to use parallel importing/converting of directory of height maps. Setting can be found in the sidebar panel (right side) when selecting folder to import
- Removed Paint Mask for terrain layers. There's no good way to "paint" onto geometry created with geometry nodes just yet. Need to wait for Blender to implement attribute painting or something before reinstating this
- Better combining tweak algorithm. (Also previous/current have been flipped in the UI). Now the 'Tweak Current' is the main setting to work with first. Then mess with 'Tweak Previous.' Tweak Previous's "range" is altered by Tweak Current which is why the order has been flipped. If Tweak Previous seems to do nothing, mess with Tweak Current first.
- Zero Edge Border mask shape defaults now all expect the default terrain size of 1000m
- Some of the rounding algorithms for Zero Edge Border mask shapes have been modified for more consistent results.
- Converting Height Map EXRs to icons resulted in black icons on import
- Removing the active layer/modifier sometimes didn't work
- Moving terrain layers up/down caused the terrain to disappear from the viewport
- Hiding layers doesn't always show the expected result
- Zero Edge Border mask shape randomize 'amount' was not scaling correctly with the radius and whatnot
In True-Terrain v5.0.0.36, we gave you more control over your terrain geometry and made some useful interface tweaks to improve clarity.
You can now set X and Y sizing separately when using the Density option in the Grid Settings under the Geometry tab. This gives you more flexibility when shaping the base resolution of your terrain.
We also added a new Viewport Amount option that lets you control viewport resolution as a fraction of your final render resolution, helping you balance performance and quality during scene setup. To keep things transparent, we now display the vertex count directly at the bottom of the Grid Settings panel, so you always know how dense your mesh is getting.
To reduce confusion, we hid options that sometimes appeared in Blender’s Redo panel (bottom left) after moving, adding, or removing layers and modifiers—they weren’t meant to be there and could lead to weird behavior.
Lastly, we fixed a bug introduced in the last update where adding new terrain layers was broken. That’s now fully resolved so you can get back to building terrains without interruption.
- When using `Density` option in `Grid Settings` of `Geometry` there's now an option to set the X and Y sizing separately
- Set the viewport resolution to fraction of the render resolution with `Viewport Amount` in `Grid Settings`
- Display vertex count for grid at the bottom of `Grid Settings`
- Hid options that sometimes appear in the Redo Operator panel (bottom left) after moving, adding, or removing layers/modifiers.
- Adding terrain layers broke with last update
In True-Terrain v5.0.0.35, we added a new quality-of-life feature and tackled a few important fixes to keep your workflow running smoothly.
We introduced a brand-new "Install Update" button in the Addon Preferences, located just below the assets path. This lets you update True-Terrain using the standard addon ZIP file, just like Blender’s built-in system—but without the usual issues Blender throws up. It’s a smarter, smoother way to keep your tools up to date.
We also fixed a bug where removing a mask layer after moving it, then adding a new one, would incorrectly reuse the removed layer’s data. That’s now been cleaned up.
Settings with descriptions can now be animated again, thanks to a refactor of the automatic description system that was previously blocking animation support.
Lastly, we fixed an issue where Zero Edge Border (ZEB) wasn't taking the shader layer's transform data into account for position and shape edge types, ensuring more accurate and expected results when using ZEB in layered setups.
- Install Update.
- This button in the Addon Preferences underneath the assets path will take the same addon zip that Blender's install addon does but it intelligently ignores the stuff Blender freaks out about.
- Moving a mask layer then removing it, then adding another layer would grab the removed layer's data
- Settings with descriptions not being able to be animated. (Refactor of the automatic description system)
- ZEB wasn't relative to layer's transform data for position and shape edge types.
In True-Terrain v5.0.0.34, we made several improvements to usability, performance, and clarity across the system.
When you create a new terrain, we now automatically set up the scene’s clip start and end values and zoom out the view, so you’re instantly ready to start working without manual adjustments.
We made a number of updates to the Zero Edge Border (ZEB) system. We fixed an issue where it was trying to connect to a non-existent socket, and cleaned up the UI by hiding randomize settings when they're not relevant—either based on split state or edge type. We also refined the randomization behavior per edge and improved falloff handling to bring it in line with other masks.
Z values are now hidden in settings where they aren't used, helping declutter the interface. In the Blending section, we renamed "From Min" and "From Max" to "Tweak Previous" and "Tweak Current" to better reflect what they do. If you're using an older file, those tweak values won’t have limits. But for new setups, we now limit the values between 0 and 1 by default, with intelligent starting points to give you smoother transitions. You can still type in values outside the range if needed.
On the performance side, we refactored our geometry node setup to dramatically improve speed. You’ll now see Normal Mask running up to 4.7x faster, Slope Mask around 4.2x faster, and Valley Mask an impressive 13.3x faster. These changes should make your workflows feel noticeably snappier, especially on complex terrains.
- Scene will be setup (clip start and end) and zoomed out when creating a new terrain.2. FIX: Stop trying to connect to non-existent socket for ZEB
- ZEB Shape: hide randomize settings when split is disabled, or hide whole randomize setting when split is enabled
- ZEB randomize settings per edge type and falloff and other fixes/changes to match other masks
- Remove Z value settings in the UI for the settings that don't use it
- Renamed "From Min" and "From Max" to "Tweak Previous" and "Tweak Current" in `Blending` section. If using existing pre v34, tweak values don't have limits. If creating in new file (ie not pulling from old node groups already existing in the file) the tweak values are now "limited" between 0 and 1, start at 0, and somewhat intelligently tweak the values. You can always go above or below 0/1 if needed by typing stuff in
- Refactored how the geo-nodes are setup leading to the following speed ups:
- Normal Mask: ~4.7x faster
- Slope Mask: ~4.2x faster
- Valley Mask: ~13.3x faster
In True-Terrain v5.0.0.33, we tied up a few loose ends from the previous update. Some filters were still missing from the side panel in v32, but we've fixed that—all filters should now show up correctly. We also fixed an issue where the Anti-Tile seed was incorrectly being influenced by the edge blur setting, so you’ll now get proper variation without unexpected behavior.
- Forgot to fix some filters in v32. Now all filters should show properly in the side panel
- Anti-Tile seed value was being driven by the edge blur setting
In True-Terrain v5.0.0.32, we fixed a couple of UI issues that were getting in the way of your workflow. Filters in the Shader tab weren’t appearing properly, making it difficult to add them in—but that’s now resolved. We also fixed missing UIs for some filters, so everything should now display as expected and let you get back to building without interruption.
- Filters weren't showing up in order to add in Shader tab
- UIs for some filters weren't showing up
In True-Terrain v5.0.0.20, we also updated compatibility—the minimum supported Blender version is now 3.6, so you'll need that or newer to run this version.
We fixed a couple of core issues too. Zero Edge Border falloff now behaves correctly, giving you the clean edge transitions you expect. And the first layer in the Terrain System now properly accepts negative values, allowing for more flexibility when shaping your base terrain.
These updates ensure everything runs smoother and aligns better with how you expect the system to behave.
- Minimum Blender version is now Blender 3.6
- Zero Edge Border falloff now works as expected
- First layer of Terrain System now accepts negative values
We made a big overhaul to the Terrain layer system!
Terrain Layer System Update! Added whole system to generate terrain procedurally. You can mix heightmaps with procedural elements too! There's honestly too much new to list everything
In True-Terrain v5.0.0.20, we brought in a few powerful new tools to give you even more creative control and flexibility across your shader workflows.
We introduced Shader Presets, allowing you to quickly apply common setups across layers without starting from scratch every time. It’s a huge time-saver when building out complex materials.
We also added the Remap Values modifier, which lets you constrain mask values between specific ranges—perfect for when you need cleaner, more controlled inputs for things like filters or transitions.
You can now apply a normal map to the entire material, which is especially useful when working with large-scale terrains like height maps and want to give the full material a unified sense of depth and surface detail.
Another addition is the new Subdivision Panel, giving you easy access to geometry subdivision settings right from within the True-Terrain interface.
We made a few UX changes too. Shader setting tabs no longer jump around when switching layers, making it easier to stay focused on what you're editing. We also refined Paint Mask behavior—randomization and falloff are now more predictable, and falloff will now always extend into black areas during previewing, even when inverted, giving you clearer visual feedback.
To help with clarity, we renamed Shader Layer "Factor" to "Opacity", better reflecting what it does and making it easier for you to understand at a glance.
Lastly, we fixed a couple of lingering issues. Muted layers and modifiers now properly reflect the stack beneath them, and we resolved some bugs with the Random Bake operator to make baking more reliable overall.
This update is all about giving you smarter tools, clearer controls, and a smoother workflow across the board.
- Shader Presets
- Remap Values modifier. Ensure mask values are between specific values (useful for filter input masks)
- Whole material normal map. Add in a normal map for the whole terrain itself (for things like Height Maps)
- Subdivision Panel
- Shader setting tabs (Shader/Modifiers and Mask/Filter) no longer change when you change shader layers
- Paint Mask randomize and falloff changes
- Falloff now always extends into the black area (when previewing) regardless of inverting
- Shader Layer Factor renamed to Opacity
- Muting a layer/modifier now correctly shows the layers/modifiers before it
- Random Bake operator fixes
Here’s the changelog summary for True-Terrain v5.0.0.18, written in your preferred format:
In True-Terrain v5.0.0.18, we’ve introduced a number of improvements to give you more control and flexibility over your materials and assets.
We added new control over shader detail with the inclusion of "Details Strength" and "Details Depth" inside each shader layer’s Material Settings. This gives you better precision when tweaking material appearance directly within your layers.
When adding a material, if we detect the default Blender material (Principled BSDF to Material Output), we now automatically clean it up for you—no more manual deletion needed.
Texture Masks can now use a UV Map instead of just position data, giving you a more traditional and predictable way to apply textures. Alongside this, both Texture Masks and Paint Masks now support attribute searches that occur after modifier evaluation, so you can use modifier-generated data in your masks more reliably.
We overhauled masking too. The new Paint Mask system replaces the old Attribute Mask, and it’s built for speed. You can quickly add a mask layer and start painting—either on vertex colors or directly onto images. This is a big step toward giving you more intuitive control when shaping your materials by hand.
In the addon preferences, we added "Remove All Assets of Type" and "Remove All Quality Levels" options to help you manage large libraries faster. The "Import From Previous" function now gives you an option to clear existing assets before import and shows a progress bar while doing so, so you’re never left guessing what's happening behind the scenes.
We’ve also made the default displacement behavior “Displacement Only” to match our new method's strengths. If you want to change that, there's now a panel option to do so—but we’re recommending this mode for best results.
The minus icon next to assets and quality level lists now completely removes the texture data and local files by default. If you'd rather keep the image files and just remove the True-Terrain data, simply Alt+click it instead.
We also stopped putting the assets folder inside the scripts directory by default, helping you keep things cleaner and more organized.
We tackled a number of fixes as well. Texture Masks now include a Scale Finesse setting, giving you better control over how masks scale. Anti-Tile now correctly shows its enabled state when copied and pasted, and UI inconsistencies with vector elements have been cleaned up. You’ll also find that creating new texture assets in preferences now works properly, and reordering textures in the preferences will now reflect correctly in the icon pickers within the 3D viewport.
All of this is aimed at giving you smoother, smarter control over your workflow—from materials to asset management—so you can focus more on creating and less on managing.
- Details Strength and Details Depth settings now in the `Material Settings` of a shader layer
- If the default material (Principled BSDF connected to the Material Output) is detected on object when adding a material it will automatically remove it
- Texture Mask now has option of using a UV Map instead of position data
- Texture Mask (and Paint Mask) Added search for attributes that finds attributes after modifiers are calculated (evaluated)
- Remove all Assets of type and Remove All Quality Levels options in their respective dropdown menus in the addon prefs
- Import From Previous new option to clear existing assets before importing new ones plus progress bar for removing assets
- Paint Mask - Replaces Attribute Mask - Workflow designed around quickly adding a mask that you can paint on - Allows for painting on Attributes (vertex colors) or and image (or using an existing image)
- Default displacement behavior is Displacement Only
- Option to change displacement from panel as new method is best at Displacement Only and we don't want to advertise anything else
- Remove Active Item (Minus symbol next to asset (textures) list and quality level lists in addon prefs) now removes the data and any local files of that texture by default. ALT Click to remove the texture data from within TT but keep all image files in their folder in the asset directory)
- No longer will TT5 put the assets folder inside the scripts folder by default
- Texture Mask now has added scale finesse setting
- Anti-Tile correctly shows when it's enabled after being copied and pasted
- Vector UI elements should no longer be at different indentions than non-Vector UI elements
- Creating a new texture asset in the addon prefs now works
- When moving textures around in the textures list in the addon prefs their new order was not represented in the icon pickers in the 3D Viewport
In True-Terrain v5.0.0.17, we streamlined the way you scale textures, groups, and procedurals. Instead of dealing with three separate axis controls, you now have a single, easy-to-use slider. For those times when you need more precision, we gave you a toggle that reveals the classic 3-axis setup along with Scale Finesse, so you can fine-tune things exactly how you like.
We also made group layer management more intuitive. Now, when you're organizing your layers, holding Alt while clicking "Move to Group" will move the selected layers out of a group and up a level. It gives you more flexibility and control when structuring complex layer setups.
To help you stay organized and work faster, we added a Favorites system. You can click the heart icon next to any shader to instantly add it to a new Favorites category. That heart turns red when it’s active, and you can Alt+click it to make Favorites your current working category. It’s our way of giving you quicker access to the shaders you use most.
We’ve also adjusted the UI so that the Shader tab is now the default view when you open Blender—until you’ve got content in the other tabs. Plus, we gave the “Move to Group” button its own unique icon to make navigation more clear.
Finally, we seriously upgraded shader previewing. You can now Alt+click to toggle between local and global previewing, and previews inside group layers actually work as expected. We fixed issues with modifier previews sticking around, and the UI now properly updates depending on what you're previewing. It’s all about giving you a smoother, smarter workflow from the moment you dive in.
- In the transform panels of any texture, group, or procedural (that has one) the 3 axes scale has been replaced with just a single float slider for easier scaling.
- A toggle has been added next to the scale slider to see the Scale Finesse or 3 axes scale version.
- Scale Finesse is multiplied by the scale factor, so take that into account
- Holding Alt when clicking the Move Selected to Group button will now move the selected layers up a level, ie out of the group layer
- Favorites category.
- There's now a heart to the right of the shader's name.
- Clicking this will automatically put it in the Favorites category (will create if it doesn't exist already) and the heart will now be colored red for that and any other textures in the favorites category.
- Clicking the heart when red will remove it from the favorites category.
- Alt+Click the heart will make the Favorites category the active category
- Shader Tab will now be the default active tab when opening blender until the other tabs have stuff in them
- Move Selected to Group has its own icon apart from the Add Group Layer button
- Better Previewing UX -
- Alt+Click Shader Preview toggles between local and global previewing and removes any modifier preview
- Group Layers are now dimly colored to show they hold the layer that is being previewed
- Previewing a shader inside a group layer actually works now
- Previewing a modifier and then previewing another modifier on a different shader layer no longer shows that first modifier is active
- When previewing a shader layer and then a modifier the UI no longer shows the shader layer as being previewed. After un-previewing that modifier the shader layer will once again show as being previewed
- Previewing a shader layer inside a group and then another layer outside of that group now correctly reattaches the necessary sockets
- Reset to defaults no longer errors out if the input is not in a node group
- Sometimes the indices of a layer or modifier would be wrong after pasting
True-Terrain v5.0.0.16 focuses on fixing several key bugs. It resolves an issue where switching between procedural and texture modes in shader layers would break modifier functionality. The Shader Speed Up toggle was showing the wrong state and has been corrected. A potential fix has been added to address crashing that occurred during addon startup when loading procedural blends. Another fix ensures that changing the quality level on the bottom shader layer no longer disables its modifiers. Lastly, the addon update check has been moved to occur after everything has loaded, improving stability during startup.
- Switching between procedurals and textures when modifiers exist on the shader layer cannot find modifiers after switching
- Shader Speed Up shows off but is on (is inverted)
- Loading from procedural blend during addon startup. Hopeful fix for all the crashing upon opening/enabling
- Changing quality level of last (bottom) shader layer disables modifiers
- Moved addon update check for after everything is loaded
Makes import from previous more accessible
- More lenient Import from Previous functionality for textures
General fixes for the Early Access release
- More intuitive Copy/Paste shader layer system
- Removed the copy paste buttons from the shader layer box dropdown
- The copy now intuitively copies based upon context (active or selected layer(s))
- Paste brings up panel with paste options (Paste as new, paste to selected, paste settings, shader item (texture/procedural shader), etc)
- Change texture only changing the active (highlighted) shader layer instead of the one clicked
- Potential fix for bug when change texture categories do not include the active texture
- Texture quality levels are visible on group layers
- Copying the Valley Mask modifier results in bug due to not having a falloff curve node
In True-Terrain v5.0.0.42, we focused on improving performance, polishing the preferences system, and laying the groundwork for upcoming asset pack support.
We introduced the first step of our new asset system with multi-pack importing—you can now select and import multiple .tt_pack files at once. While official packs are still on the way, this update gets everything ready for when they drop.
To give you better visibility, we added version info to the panel, so you always know what you're working with. We also switched the default icon format to .webp, which offers smaller file sizes and alpha support. Icons are now optimized during import or when loading from previous installs, helping reduce load times and improve general performance. You’ll also now see the actual icon paths listed in the preferences, giving you more transparency over file management.
We aligned the Author tag to True-VFX standards, and made a bunch of small quality-of-life tweaks across the Preferences, including improvements to how the remove functions behave—so they now match what you'd naturally expect. On top of that, both Make Local and Load From Previous are now multi-threaded, which means faster performance when bringing in assets or preparing files. We even refined the progress bars to better reflect what’s happening under the hood.
Several bugs were fixed too. We stopped accidental overwrites of previews that caused ResourceWarning messages on unregistering, and we now show enum descriptions properly when adding layers or modifiers, giving you better feedback. We also resolved issues around image resizing, missing names on new items in preferences, broken folder paths when adding new icons, and misbehavior when moving active items up or down in the Preferences.
Finally, heightmap icons generated during import are now properly converted, so everything looks and loads the way it should.
This update sets the stage for future content packs, speeds things up across the board, and makes the preferences experience more predictable and user-friendly.
- Import Packs: Can select multiple .tt_pack files for importing (packs to come later)
Heading 1
Heading 2
Heading 3
Heading 4
Heading 5
Heading 6
Lorem ipsum dolor sit amet, consectetur adipiscing elit, sed do eiusmod tempor incididunt ut labore et dolore magna aliqua. Ut enim ad minim veniam, quis nostrud exercitation ullamco laboris nisi ut aliquip ex ea commodo consequat. Duis aute irure dolor in reprehenderit in voluptate velit esse cillum dolore eu fugiat nulla pariatur.
Block quote
Ordered list
- Item 1
- Item 2
- Item 3
Unordered list
- Item A
- Item B
- Item C
Bold text
Emphasis
Superscript
Subscript
We fixed some... Oopsies!
Heading 1
Heading 2
Heading 3
Heading 4
Heading 5
Heading 6
Lorem ipsum dolor sit amet, consectetur adipiscing elit, sed do eiusmod tempor incididunt ut labore et dolore magna aliqua. Ut enim ad minim veniam, quis nostrud exercitation ullamco laboris nisi ut aliquip ex ea commodo consequat. Duis aute irure dolor in reprehenderit in voluptate velit esse cillum dolore eu fugiat nulla pariatur.
Block quote
Ordered list
- Item 1
- Item 2
- Item 3
Unordered list
- Item A
- Item B
- Item C
Bold text
Emphasis
Superscript
Subscript
In True-Terrain v5.0.0.40, we introduced a powerful new blending tool and continued refining the system for a more intuitive and streamlined experience.
The highlight of this release is the new Layer Range Mask, which lets you use height data from either the current or previous layers to control how the current layer blends with the next one. This gives you precise control over where a layer appears, while preserving the underlying terrain detail.
Within the Layer Range Mask, you can choose between using the current or previous layer's height data, and clamp the influence between specific value ranges using the new From Min, From Max, To Min, and To Max controls. You can also make these ranges relative to the minimum and maximum values of the source layer, which makes it much easier to remap the full height range with minimal effort. At a value of 0.0, the mask uses the previous layer; at 1.0, it uses the current one—giving you smooth, intuitive control.
To support this new system, we renamed the "Data" tab in the terrain settings to "Layer", and improved the tab descriptions throughout to better explain what each one is for. We also moved the tweaking and blending settings into the new Layer Range Mask, keeping everything tied to blending in one place for better clarity.
To clean up the UI, math options in the Blending tab will now only show if "Use Math" is enabled, and we filled in some missing features—Invert and Add settings are now available for the Zero Edge Border mask, and its default values now better reflect the default 1000m terrain size.
We also tackled a few fixes: no more ‘WARN’ messages at startup, and we added the missing “Use Ridges” setting in the Valley Mask presets, along with proper descriptions for those settings so you always know what you're working with.
This update gives you smarter blending, cleaner UI organization, and a more robust toolkit for layering your terrain exactly the way you want it.
- Layer Range Mask: Use the height data from the current layer or the previous layers to blend the current layer with the next layer. This is useful for putting the current layer at specific places while keeping underlying details.
- Previous Layer | Current Layer: Choose to use the height data from the previous layer or the current layer as the source for this mask.
- Clamp: Clamp the values to the To Min and To Max values.
- From Min | From Max: The range of values to use from the source layer.
- Use Min | Use Max: Make the From Min and From Max values relative to the the minimum and maximum values from the source. The From Min and From Max values will then add to the minimum/maximum value. Good for easily getting the whole height range of the source layer into the To values.
- To Min | To Max: The range of values to map the from values to. 0.0 will result in the previous layers values, 1.0 will result in the current layers values.
Heading 1
Heading 2
Heading 3
Heading 4
Heading 5
Heading 6
Lorem ipsum dolor sit amet, consectetur adipiscing elit, sed do eiusmod tempor incididunt ut labore et dolore magna aliqua. Ut enim ad minim veniam, quis nostrud exercitation ullamco laboris nisi ut aliquip ex ea commodo consequat. Duis aute irure dolor in reprehenderit in voluptate velit esse cillum dolore eu fugiat nulla pariatur.
Block quote
Ordered list
- Item 1
- Item 2
- Item 3
Unordered list
- Item A
- Item B
- Item C
Bold text
Emphasis
Superscript
Subscript
In True-Terrain v5.0.0.39, we expanded the terrain system with powerful new modifiers, a handy gizmo, and a few key changes to improve clarity in the workflow.
Terrain Noise layers now have their own transform gizmo, just like Height Map layers! The difference is that this gizmo always resets to the center of the terrain object. This way, even if you move the noise layer around, you won’t lose track of the gizmo—perfect for keeping things manageable when working with large terrains.
We also introduced several new terrain modifiers. The Terrain Blur Mask Modifier, found in the Blending tab, allows you to blur the mask values from previous layers, helping you smooth transitions between effects. The Terrain Blur Modifier (under the Modifiers tab) lets you blur the geometry itself, with options to affect just the Z axis or all axes. And with the new Terrain Inflate/Deflate Modifier, you can expand terrain shapes for softer features or contract them to create sharper, more dramatic formations.
To better reflect the intended workflow, we changed the default tab in the sidebar to Geometry instead of Shader, since that’s usually where your terrain-building process begins.
We also reorganized how masks are handled. What used to be called “Masks” under the Modifiers tab are now properly placed in the Blending tab, since they’ve always influenced blending—not terrain shape. At the same time, we clarified the distinction between masks and mask modifiers for both shading and geometry. For example, "Remap Values" was moved to the "Mask Modifiers" section, as it modifies incoming mask data rather than functioning as a mask on its own.
To prevent unexpected results, we added a warning when attempting to bake shader maps on terrains that use geometry nodes, since those can generate geometry the baker can’t always see.
Finally, we corrected icons for several mask types, including Texture, Valley, and Remap Values, so your UI now better reflects what you’re working with.
This update gives you more control and flexibility over terrain shaping while continuing to refine the user experience and interface logic for a smoother workflow.
- Terrain Noise layers now have a transform gizmo similar to Height Map layers! The only difference is that the gizmo resets to the center of the terrain object instead of staying with the layer. This is so that the gizmo doesn't get lost when you move the layer around as if you go exploring your gizmo may be quite far off the edge of the terrain unlike you would do with a height map layer.
- Terrain Blur Mask Modifier: Blurs values of the masks that came before. Found under the Blending tab.
- Terrain Modifiers: What once was going to be 'Filter's in the Modifiers tab now is just modifiers since 'Masks' are now over in the Blender tab.
- Terrain Blur Modifier: Blurs the terrain geometry. Can switch between blurring just the Z axis or all axes. Found under the Modifiers tab.
- Terrain Inflate/Deflate Modifier: Inflate the terrain geometry to create larger features or switch to 'Deflate' and create sharp features. Found under the Modifiers tab.
Heading 1
Heading 2
Heading 3
Heading 4
Heading 5
Heading 6
Lorem ipsum dolor sit amet, consectetur adipiscing elit, sed do eiusmod tempor incididunt ut labore et dolore magna aliqua. Ut enim ad minim veniam, quis nostrud exercitation ullamco laboris nisi ut aliquip ex ea commodo consequat. Duis aute irure dolor in reprehenderit in voluptate velit esse cillum dolore eu fugiat nulla pariatur.
Block quote
Ordered list
- Item 1
- Item 2
- Item 3
Unordered list
- Item A
- Item B
- Item C
Bold text
Emphasis
Superscript
Subscript
In True-Terrain v5.0.0.38, we brought back a key feature to improve visual detail and continued refining the update system and terrain workflow.
Height maps now automatically generate normal maps in the shader, giving your terrain extra surface detail and realism. When you add a height map layer, it’ll now include a corresponding normal map—and if you add a shader to a terrain that already has height maps, it’ll generate normal maps for those as well. These normal maps are also masked in line with their height map layers, so everything stays visually consistent.
We also improved the Install Update experience. Now when it finishes, you’ll get a popup prompting you to restart Blender, with buttons to do it right away or later—making the process clearer and more user-friendly. The installer now also targets the correct location more reliably, and if debug mode is on (which it is by default), you’ll see helpful info in the terminal to assist with troubleshooting if anything still goes wrong.
On the fix side, we resolved a bug where switching between textures could throw an error if the "from" texture had more quality levels than the "to" texture—especially when working at the highest level. That’s now fixed.
You can now create multiple terrain objects in the same scene, which gives you more flexibility in building complex environments. We also made sure that the auto zoom-out on terrain creation works even if the object is active but not selected, ensuring the viewport always frames your new terrain correctly.
Lastly, we fixed a bug where the strength of normal maps wasn’t being calculated properly, so now your terrain should display the intended level of bump and surface detail every time.
This update brings visual fidelity improvements and workflow polish to help you move faster and create with more precision.
- Added back in height maps as normal maps in the shader.
- Now when you add in a height map layer it will also add in a normal map if you have a shader on the terrain.
- Adding a shader to the terrain should add in all height maps currently on the terrain.
- Normal maps should be masked similarly to their respective height map layers.
Heading 1
Heading 2
Heading 3
Heading 4
Heading 5
Heading 6
Lorem ipsum dolor sit amet, consectetur adipiscing elit, sed do eiusmod tempor incididunt ut labore et dolore magna aliqua. Ut enim ad minim veniam, quis nostrud exercitation ullamco laboris nisi ut aliquip ex ea commodo consequat. Duis aute irure dolor in reprehenderit in voluptate velit esse cillum dolore eu fugiat nulla pariatur.
Block quote
Ordered list
- Item 1
- Item 2
- Item 3
Unordered list
- Item A
- Item B
- Item C
Bold text
Emphasis
Superscript
Subscript
In True-Terrain v5.0.0.37, we focused on cleanup, refinement, and prepping the system for better long-term stability—especially around height maps and masking.
We removed several outdated settings from True-Terrain 4.x, including unnecessary height map preferences and the rarely used option to import settings based on image names. To improve clarity, we renamed the "Amount" setting under height maps to "Height Multiplier", making it more intuitive for you to adjust elevation strength.
A notable addition is the new option for parallel importing and converting entire directories of height maps, helping you work faster when bringing in large batches. You’ll find this toggle in the sidebar when selecting a folder to import.
We also made a deliberate choice to remove the Paint Mask option from terrain layers. Since Blender doesn’t currently support painting directly onto geometry nodes-based terrain, this feature wasn’t working as expected. We’ll revisit it once Blender adds attribute painting or similar functionality.
The tweaking system for layer blending has been improved, with a smarter combining algorithm. We flipped the "Previous" and "Current" tweak controls in the UI—now "Tweak Current" is the one you should adjust first, as it directly influences how "Tweak Previous" behaves. This change gives you more predictable and useful results when blending layers.
We also updated the Zero Edge Border (ZEB) mask shape defaults to better match the default terrain size of 1000m, and we tweaked some of the rounding algorithms for more consistent edge behavior. The randomize amount in ZEB masks now scales properly with radius and other settings, giving you better results when shaping terrain edges.
On the bug-fix front, we resolved an issue where converting EXR height maps into icons resulted in black previews, and we fixed problems with removing layers or modifiers that didn’t always work. We also addressed a bug where moving terrain layers up or down caused the terrain to disappear, and made layer visibility more reliable so what you see in the viewport now accurately reflects what’s active.
This update helps tighten the system, streamline the experience, and remove features that weren’t fully usable yet—making things cleaner and more stable for you moving forward.
Heading 1
Heading 2
Heading 3
Heading 4
Heading 5
Heading 6
Lorem ipsum dolor sit amet, consectetur adipiscing elit, sed do eiusmod tempor incididunt ut labore et dolore magna aliqua. Ut enim ad minim veniam, quis nostrud exercitation ullamco laboris nisi ut aliquip ex ea commodo consequat. Duis aute irure dolor in reprehenderit in voluptate velit esse cillum dolore eu fugiat nulla pariatur.
Block quote
Ordered list
- Item 1
- Item 2
- Item 3
Unordered list
- Item A
- Item B
- Item C
Bold text
Emphasis
Superscript
Subscript
In True-Terrain v5.0.0.36, we gave you more control over your terrain geometry and made some useful interface tweaks to improve clarity.
You can now set X and Y sizing separately when using the Density option in the Grid Settings under the Geometry tab. This gives you more flexibility when shaping the base resolution of your terrain.
We also added a new Viewport Amount option that lets you control viewport resolution as a fraction of your final render resolution, helping you balance performance and quality during scene setup. To keep things transparent, we now display the vertex count directly at the bottom of the Grid Settings panel, so you always know how dense your mesh is getting.
To reduce confusion, we hid options that sometimes appeared in Blender’s Redo panel (bottom left) after moving, adding, or removing layers and modifiers—they weren’t meant to be there and could lead to weird behavior.
Lastly, we fixed a bug introduced in the last update where adding new terrain layers was broken. That’s now fully resolved so you can get back to building terrains without interruption.
- When using `Density` option in `Grid Settings` of `Geometry` there's now an option to set the X and Y sizing separately
- Set the viewport resolution to fraction of the render resolution with `Viewport Amount` in `Grid Settings`
- Display vertex count for grid at the bottom of `Grid Settings`
Heading 1
Heading 2
Heading 3
Heading 4
Heading 5
Heading 6
Lorem ipsum dolor sit amet, consectetur adipiscing elit, sed do eiusmod tempor incididunt ut labore et dolore magna aliqua. Ut enim ad minim veniam, quis nostrud exercitation ullamco laboris nisi ut aliquip ex ea commodo consequat. Duis aute irure dolor in reprehenderit in voluptate velit esse cillum dolore eu fugiat nulla pariatur.
Block quote
Ordered list
- Item 1
- Item 2
- Item 3
Unordered list
- Item A
- Item B
- Item C
Bold text
Emphasis
Superscript
Subscript
In True-Terrain v5.0.0.35, we added a new quality-of-life feature and tackled a few important fixes to keep your workflow running smoothly.
We introduced a brand-new "Install Update" button in the Addon Preferences, located just below the assets path. This lets you update True-Terrain using the standard addon ZIP file, just like Blender’s built-in system—but without the usual issues Blender throws up. It’s a smarter, smoother way to keep your tools up to date.
We also fixed a bug where removing a mask layer after moving it, then adding a new one, would incorrectly reuse the removed layer’s data. That’s now been cleaned up.
Settings with descriptions can now be animated again, thanks to a refactor of the automatic description system that was previously blocking animation support.
Lastly, we fixed an issue where Zero Edge Border (ZEB) wasn't taking the shader layer's transform data into account for position and shape edge types, ensuring more accurate and expected results when using ZEB in layered setups.
- Install Update.
- This button in the Addon Preferences underneath the assets path will take the same addon zip that Blender's install addon does but it intelligently ignores the stuff Blender freaks out about.
Heading 1
Heading 2
Heading 3
Heading 4
Heading 5
Heading 6
Lorem ipsum dolor sit amet, consectetur adipiscing elit, sed do eiusmod tempor incididunt ut labore et dolore magna aliqua. Ut enim ad minim veniam, quis nostrud exercitation ullamco laboris nisi ut aliquip ex ea commodo consequat. Duis aute irure dolor in reprehenderit in voluptate velit esse cillum dolore eu fugiat nulla pariatur.
Block quote
Ordered list
- Item 1
- Item 2
- Item 3
Unordered list
- Item A
- Item B
- Item C
Bold text
Emphasis
Superscript
Subscript
In True-Terrain v5.0.0.34, we made several improvements to usability, performance, and clarity across the system.
When you create a new terrain, we now automatically set up the scene’s clip start and end values and zoom out the view, so you’re instantly ready to start working without manual adjustments.
We made a number of updates to the Zero Edge Border (ZEB) system. We fixed an issue where it was trying to connect to a non-existent socket, and cleaned up the UI by hiding randomize settings when they're not relevant—either based on split state or edge type. We also refined the randomization behavior per edge and improved falloff handling to bring it in line with other masks.
Z values are now hidden in settings where they aren't used, helping declutter the interface. In the Blending section, we renamed "From Min" and "From Max" to "Tweak Previous" and "Tweak Current" to better reflect what they do. If you're using an older file, those tweak values won’t have limits. But for new setups, we now limit the values between 0 and 1 by default, with intelligent starting points to give you smoother transitions. You can still type in values outside the range if needed.
On the performance side, we refactored our geometry node setup to dramatically improve speed. You’ll now see Normal Mask running up to 4.7x faster, Slope Mask around 4.2x faster, and Valley Mask an impressive 13.3x faster. These changes should make your workflows feel noticeably snappier, especially on complex terrains.
Heading 1
Heading 2
Heading 3
Heading 4
Heading 5
Heading 6
Lorem ipsum dolor sit amet, consectetur adipiscing elit, sed do eiusmod tempor incididunt ut labore et dolore magna aliqua. Ut enim ad minim veniam, quis nostrud exercitation ullamco laboris nisi ut aliquip ex ea commodo consequat. Duis aute irure dolor in reprehenderit in voluptate velit esse cillum dolore eu fugiat nulla pariatur.
Block quote
Ordered list
- Item 1
- Item 2
- Item 3
Unordered list
- Item A
- Item B
- Item C
Bold text
Emphasis
Superscript
Subscript
In True-Terrain v5.0.0.33, we tied up a few loose ends from the previous update. Some filters were still missing from the side panel in v32, but we've fixed that—all filters should now show up correctly. We also fixed an issue where the Anti-Tile seed was incorrectly being influenced by the edge blur setting, so you’ll now get proper variation without unexpected behavior.
Heading 1
Heading 2
Heading 3
Heading 4
Heading 5
Heading 6
Lorem ipsum dolor sit amet, consectetur adipiscing elit, sed do eiusmod tempor incididunt ut labore et dolore magna aliqua. Ut enim ad minim veniam, quis nostrud exercitation ullamco laboris nisi ut aliquip ex ea commodo consequat. Duis aute irure dolor in reprehenderit in voluptate velit esse cillum dolore eu fugiat nulla pariatur.
Block quote
Ordered list
- Item 1
- Item 2
- Item 3
Unordered list
- Item A
- Item B
- Item C
Bold text
Emphasis
Superscript
Subscript
In True-Terrain v5.0.0.32, we fixed a couple of UI issues that were getting in the way of your workflow. Filters in the Shader tab weren’t appearing properly, making it difficult to add them in—but that’s now resolved. We also fixed missing UIs for some filters, so everything should now display as expected and let you get back to building without interruption.
Heading 1
Heading 2
Heading 3
Heading 4
Heading 5
Heading 6
Lorem ipsum dolor sit amet, consectetur adipiscing elit, sed do eiusmod tempor incididunt ut labore et dolore magna aliqua. Ut enim ad minim veniam, quis nostrud exercitation ullamco laboris nisi ut aliquip ex ea commodo consequat. Duis aute irure dolor in reprehenderit in voluptate velit esse cillum dolore eu fugiat nulla pariatur.
Block quote
Ordered list
- Item 1
- Item 2
- Item 3
Unordered list
- Item A
- Item B
- Item C
Bold text
Emphasis
Superscript
Subscript
In True-Terrain v5.0.0.20, we also updated compatibility—the minimum supported Blender version is now 3.6, so you'll need that or newer to run this version.
We fixed a couple of core issues too. Zero Edge Border falloff now behaves correctly, giving you the clean edge transitions you expect. And the first layer in the Terrain System now properly accepts negative values, allowing for more flexibility when shaping your base terrain.
These updates ensure everything runs smoother and aligns better with how you expect the system to behave.
Heading 1
Heading 2
Heading 3
Heading 4
Heading 5
Heading 6
Lorem ipsum dolor sit amet, consectetur adipiscing elit, sed do eiusmod tempor incididunt ut labore et dolore magna aliqua. Ut enim ad minim veniam, quis nostrud exercitation ullamco laboris nisi ut aliquip ex ea commodo consequat. Duis aute irure dolor in reprehenderit in voluptate velit esse cillum dolore eu fugiat nulla pariatur.
Block quote
Ordered list
- Item 1
- Item 2
- Item 3
Unordered list
- Item A
- Item B
- Item C
Bold text
Emphasis
Superscript
Subscript
We made a big overhaul to the Terrain layer system!
Terrain Layer System Update! Added whole system to generate terrain procedurally. You can mix heightmaps with procedural elements too! There's honestly too much new to list everything
Heading 1
Heading 2
Heading 3
Heading 4
Heading 5
Heading 6
Lorem ipsum dolor sit amet, consectetur adipiscing elit, sed do eiusmod tempor incididunt ut labore et dolore magna aliqua. Ut enim ad minim veniam, quis nostrud exercitation ullamco laboris nisi ut aliquip ex ea commodo consequat. Duis aute irure dolor in reprehenderit in voluptate velit esse cillum dolore eu fugiat nulla pariatur.
Block quote
Ordered list
- Item 1
- Item 2
- Item 3
Unordered list
- Item A
- Item B
- Item C
Bold text
Emphasis
Superscript
Subscript
In True-Terrain v5.0.0.20, we brought in a few powerful new tools to give you even more creative control and flexibility across your shader workflows.
We introduced Shader Presets, allowing you to quickly apply common setups across layers without starting from scratch every time. It’s a huge time-saver when building out complex materials.
We also added the Remap Values modifier, which lets you constrain mask values between specific ranges—perfect for when you need cleaner, more controlled inputs for things like filters or transitions.
You can now apply a normal map to the entire material, which is especially useful when working with large-scale terrains like height maps and want to give the full material a unified sense of depth and surface detail.
Another addition is the new Subdivision Panel, giving you easy access to geometry subdivision settings right from within the True-Terrain interface.
We made a few UX changes too. Shader setting tabs no longer jump around when switching layers, making it easier to stay focused on what you're editing. We also refined Paint Mask behavior—randomization and falloff are now more predictable, and falloff will now always extend into black areas during previewing, even when inverted, giving you clearer visual feedback.
To help with clarity, we renamed Shader Layer "Factor" to "Opacity", better reflecting what it does and making it easier for you to understand at a glance.
Lastly, we fixed a couple of lingering issues. Muted layers and modifiers now properly reflect the stack beneath them, and we resolved some bugs with the Random Bake operator to make baking more reliable overall.
This update is all about giving you smarter tools, clearer controls, and a smoother workflow across the board.
- Shader Presets
- Remap Values modifier. Ensure mask values are between specific values (useful for filter input masks)
- Whole material normal map. Add in a normal map for the whole terrain itself (for things like Height Maps)
- Subdivision Panel
Heading 1
Heading 2
Heading 3
Heading 4
Heading 5
Heading 6
Lorem ipsum dolor sit amet, consectetur adipiscing elit, sed do eiusmod tempor incididunt ut labore et dolore magna aliqua. Ut enim ad minim veniam, quis nostrud exercitation ullamco laboris nisi ut aliquip ex ea commodo consequat. Duis aute irure dolor in reprehenderit in voluptate velit esse cillum dolore eu fugiat nulla pariatur.
Block quote
Ordered list
- Item 1
- Item 2
- Item 3
Unordered list
- Item A
- Item B
- Item C
Bold text
Emphasis
Superscript
Subscript
Here’s the changelog summary for True-Terrain v5.0.0.18, written in your preferred format:
In True-Terrain v5.0.0.18, we’ve introduced a number of improvements to give you more control and flexibility over your materials and assets.
We added new control over shader detail with the inclusion of "Details Strength" and "Details Depth" inside each shader layer’s Material Settings. This gives you better precision when tweaking material appearance directly within your layers.
When adding a material, if we detect the default Blender material (Principled BSDF to Material Output), we now automatically clean it up for you—no more manual deletion needed.
Texture Masks can now use a UV Map instead of just position data, giving you a more traditional and predictable way to apply textures. Alongside this, both Texture Masks and Paint Masks now support attribute searches that occur after modifier evaluation, so you can use modifier-generated data in your masks more reliably.
We overhauled masking too. The new Paint Mask system replaces the old Attribute Mask, and it’s built for speed. You can quickly add a mask layer and start painting—either on vertex colors or directly onto images. This is a big step toward giving you more intuitive control when shaping your materials by hand.
In the addon preferences, we added "Remove All Assets of Type" and "Remove All Quality Levels" options to help you manage large libraries faster. The "Import From Previous" function now gives you an option to clear existing assets before import and shows a progress bar while doing so, so you’re never left guessing what's happening behind the scenes.
We’ve also made the default displacement behavior “Displacement Only” to match our new method's strengths. If you want to change that, there's now a panel option to do so—but we’re recommending this mode for best results.
The minus icon next to assets and quality level lists now completely removes the texture data and local files by default. If you'd rather keep the image files and just remove the True-Terrain data, simply Alt+click it instead.
We also stopped putting the assets folder inside the scripts directory by default, helping you keep things cleaner and more organized.
We tackled a number of fixes as well. Texture Masks now include a Scale Finesse setting, giving you better control over how masks scale. Anti-Tile now correctly shows its enabled state when copied and pasted, and UI inconsistencies with vector elements have been cleaned up. You’ll also find that creating new texture assets in preferences now works properly, and reordering textures in the preferences will now reflect correctly in the icon pickers within the 3D viewport.
All of this is aimed at giving you smoother, smarter control over your workflow—from materials to asset management—so you can focus more on creating and less on managing.
- Details Strength and Details Depth settings now in the `Material Settings` of a shader layer
- If the default material (Principled BSDF connected to the Material Output) is detected on object when adding a material it will automatically remove it
- Texture Mask now has option of using a UV Map instead of position data
- Texture Mask (and Paint Mask) Added search for attributes that finds attributes after modifiers are calculated (evaluated)
- Remove all Assets of type and Remove All Quality Levels options in their respective dropdown menus in the addon prefs
- Import From Previous new option to clear existing assets before importing new ones plus progress bar for removing assets
- Paint Mask - Replaces Attribute Mask - Workflow designed around quickly adding a mask that you can paint on - Allows for painting on Attributes (vertex colors) or and image (or using an existing image)
Heading 1
Heading 2
Heading 3
Heading 4
Heading 5
Heading 6
Lorem ipsum dolor sit amet, consectetur adipiscing elit, sed do eiusmod tempor incididunt ut labore et dolore magna aliqua. Ut enim ad minim veniam, quis nostrud exercitation ullamco laboris nisi ut aliquip ex ea commodo consequat. Duis aute irure dolor in reprehenderit in voluptate velit esse cillum dolore eu fugiat nulla pariatur.
Block quote
Ordered list
- Item 1
- Item 2
- Item 3
Unordered list
- Item A
- Item B
- Item C
Bold text
Emphasis
Superscript
Subscript
In True-Terrain v5.0.0.17, we streamlined the way you scale textures, groups, and procedurals. Instead of dealing with three separate axis controls, you now have a single, easy-to-use slider. For those times when you need more precision, we gave you a toggle that reveals the classic 3-axis setup along with Scale Finesse, so you can fine-tune things exactly how you like.
We also made group layer management more intuitive. Now, when you're organizing your layers, holding Alt while clicking "Move to Group" will move the selected layers out of a group and up a level. It gives you more flexibility and control when structuring complex layer setups.
To help you stay organized and work faster, we added a Favorites system. You can click the heart icon next to any shader to instantly add it to a new Favorites category. That heart turns red when it’s active, and you can Alt+click it to make Favorites your current working category. It’s our way of giving you quicker access to the shaders you use most.
We’ve also adjusted the UI so that the Shader tab is now the default view when you open Blender—until you’ve got content in the other tabs. Plus, we gave the “Move to Group” button its own unique icon to make navigation more clear.
Finally, we seriously upgraded shader previewing. You can now Alt+click to toggle between local and global previewing, and previews inside group layers actually work as expected. We fixed issues with modifier previews sticking around, and the UI now properly updates depending on what you're previewing. It’s all about giving you a smoother, smarter workflow from the moment you dive in.
- In the transform panels of any texture, group, or procedural (that has one) the 3 axes scale has been replaced with just a single float slider for easier scaling.
- A toggle has been added next to the scale slider to see the Scale Finesse or 3 axes scale version.
- Scale Finesse is multiplied by the scale factor, so take that into account
- Holding Alt when clicking the Move Selected to Group button will now move the selected layers up a level, ie out of the group layer
- Favorites category.
- There's now a heart to the right of the shader's name.
- Clicking this will automatically put it in the Favorites category (will create if it doesn't exist already) and the heart will now be colored red for that and any other textures in the favorites category.
- Clicking the heart when red will remove it from the favorites category.
- Alt+Click the heart will make the Favorites category the active category
Heading 1
Heading 2
Heading 3
Heading 4
Heading 5
Heading 6
Lorem ipsum dolor sit amet, consectetur adipiscing elit, sed do eiusmod tempor incididunt ut labore et dolore magna aliqua. Ut enim ad minim veniam, quis nostrud exercitation ullamco laboris nisi ut aliquip ex ea commodo consequat. Duis aute irure dolor in reprehenderit in voluptate velit esse cillum dolore eu fugiat nulla pariatur.
Block quote
Ordered list
- Item 1
- Item 2
- Item 3
Unordered list
- Item A
- Item B
- Item C
Bold text
Emphasis
Superscript
Subscript
True-Terrain v5.0.0.16 focuses on fixing several key bugs. It resolves an issue where switching between procedural and texture modes in shader layers would break modifier functionality. The Shader Speed Up toggle was showing the wrong state and has been corrected. A potential fix has been added to address crashing that occurred during addon startup when loading procedural blends. Another fix ensures that changing the quality level on the bottom shader layer no longer disables its modifiers. Lastly, the addon update check has been moved to occur after everything has loaded, improving stability during startup.
Heading 1
Heading 2
Heading 3
Heading 4
Heading 5
Heading 6
Lorem ipsum dolor sit amet, consectetur adipiscing elit, sed do eiusmod tempor incididunt ut labore et dolore magna aliqua. Ut enim ad minim veniam, quis nostrud exercitation ullamco laboris nisi ut aliquip ex ea commodo consequat. Duis aute irure dolor in reprehenderit in voluptate velit esse cillum dolore eu fugiat nulla pariatur.
Block quote
Ordered list
- Item 1
- Item 2
- Item 3
Unordered list
- Item A
- Item B
- Item C
Bold text
Emphasis
Superscript
Subscript
Makes import from previous more accessible
Heading 1
Heading 2
Heading 3
Heading 4
Heading 5
Heading 6
Lorem ipsum dolor sit amet, consectetur adipiscing elit, sed do eiusmod tempor incididunt ut labore et dolore magna aliqua. Ut enim ad minim veniam, quis nostrud exercitation ullamco laboris nisi ut aliquip ex ea commodo consequat. Duis aute irure dolor in reprehenderit in voluptate velit esse cillum dolore eu fugiat nulla pariatur.
Block quote
Ordered list
- Item 1
- Item 2
- Item 3
Unordered list
- Item A
- Item B
- Item C
Bold text
Emphasis
Superscript
Subscript
General fixes for the Early Access release
- More intuitive Copy/Paste shader layer system
- Removed the copy paste buttons from the shader layer box dropdown
- The copy now intuitively copies based upon context (active or selected layer(s))
- Paste brings up panel with paste options (Paste as new, paste to selected, paste settings, shader item (texture/procedural shader), etc)
Heading 1
Heading 2
Heading 3
Heading 4
Heading 5
Heading 6
Lorem ipsum dolor sit amet, consectetur adipiscing elit, sed do eiusmod tempor incididunt ut labore et dolore magna aliqua. Ut enim ad minim veniam, quis nostrud exercitation ullamco laboris nisi ut aliquip ex ea commodo consequat. Duis aute irure dolor in reprehenderit in voluptate velit esse cillum dolore eu fugiat nulla pariatur.
Block quote
Ordered list
- Item 1
- Item 2
- Item 3
Unordered list
- Item A
- Item B
- Item C
Bold text
Emphasis
Superscript
Subscript
Heading 1
Heading 2
Heading 3
Heading 4
Heading 5
Heading 6
Lorem ipsum dolor sit amet, consectetur adipiscing elit, sed do eiusmod tempor incididunt ut labore et dolore magna aliqua. Ut enim ad minim veniam, quis nostrud exercitation ullamco laboris nisi ut aliquip ex ea commodo consequat. Duis aute irure dolor in reprehenderit in voluptate velit esse cillum dolore eu fugiat nulla pariatur.
CODE BLOCK
This is a normal paragraph
Block quote
Ordered list
- Item 1
- Item 2
- Item 3
Unordered list
- Item A
- Item B
- Item C
Bold text
Emphasis
Superscript
Subscript