
Addon Preferences
Preferences
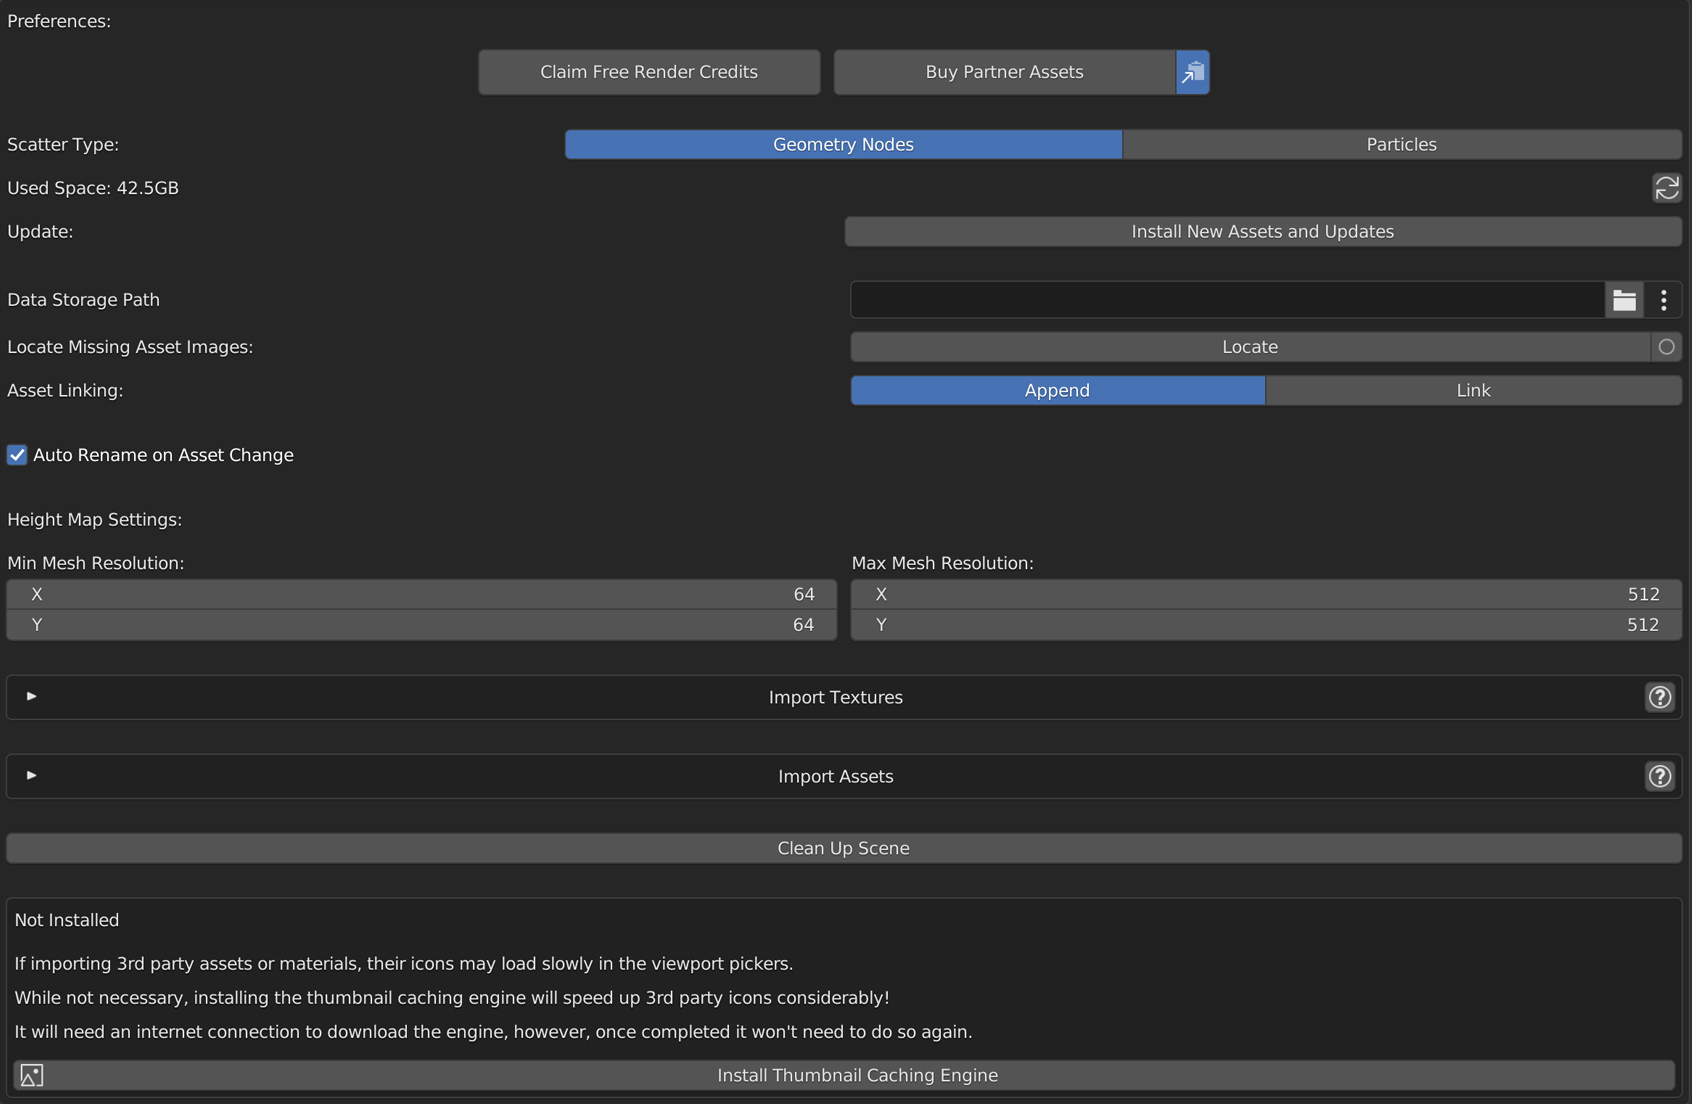
Scatter Type: Choose what system to use for scattering assets
- Geometry Nodes: Use the newer and more advanced Geometry Nodes Asset Scattering system
- Particles: Use Blender's particle system to scatter assets
Used Space: Hit the refresh button on the right side to see how much space True-Terrain is taking up on your device
Update: Use this to install patches and other updates we send you. Once clicked, find and choose the zip file you downloaded to install.
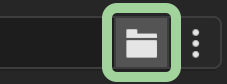
Data Storage Path: The location of the assets and textures. Click the Folder icon to choose with a folder picker
Move Assets: Move all assets, textures, and their respective icons to the chosen file path (Data Storage Path)
Data Storage Path: Change/move all assets and textures to another folder or drive
Locate Missing Asset Image: Locate all missing True Terrain images in the active Blender file relative to the data path
Check Images on Load: (The circle icon toggle next to Location Missing Asset Image) On load of any Blender File, find all missing True Terrain image files
Asset Linking: How the assets are added to a scene
Auto Rename on Asset Change: Rename the scatter system to match the asset type and quality level when changing an asset
Import Textures: Import your own textures
Import Assets: Import your own assets
Clean Up Scene: Remove unused objects from the blend file that were brought in for assets but are no longer in use
Thumbnail Caching Engine: Install the thumbnail caching engine to make non-TrueTerrain icons as fast as possible when selecting materials or assets.
Data Path Operations
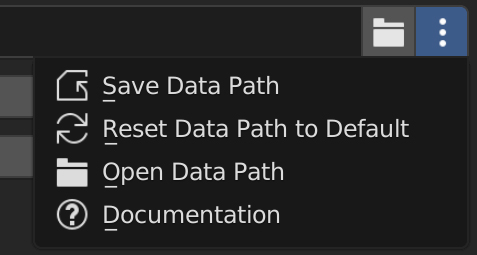
- Save Data Path: Save the data path without moving any assets
- Reset Data Path to Default: Reset the data path to the default True Terrain folder
- Open Data Path: Open the data path location
- Documentation: Open the documentation for Data Path
Tutorial

In order to transfer your files to another location accessible by your computer follow the following:
- Click Folder Picker (folder icon) and navigate to where you'd like to store your files. True Terrain will create its own folder (unless a folder by the same name it was going to create exists in this folder) in this folder so you don't have to unless you simply want to. And that's it. Your files will automatically move to that location. It may take a while during which
Texture Naming Standard
Folders: [Biome]_[Color]_[Surface]_[###]
Images: [Biome]_[Color]_[Surface]_[###]_[Texture Type]_[Texture Resolution].file_type
Texture Types:
- Ambient Occlusion - AO
- Color/Albedo - COL
- Displacement - DISP
- Gloss - GLOSS
- Normal - NRM
- Reflection - REFL
Import Textures
Import textures that aren't from True VFX
Instructions: Each section has instructions to help you understand what this section is for and what it expects from you
Install Textures: Click to install new textures according to the install type selected. If disabled make sure no fields are red.
Reload Textures: Click to reload all textures.
Pre-Named
Import textures already named correctly for True-Terrain. You only need to input the root folder that contains all of the textures you're wanting to import.
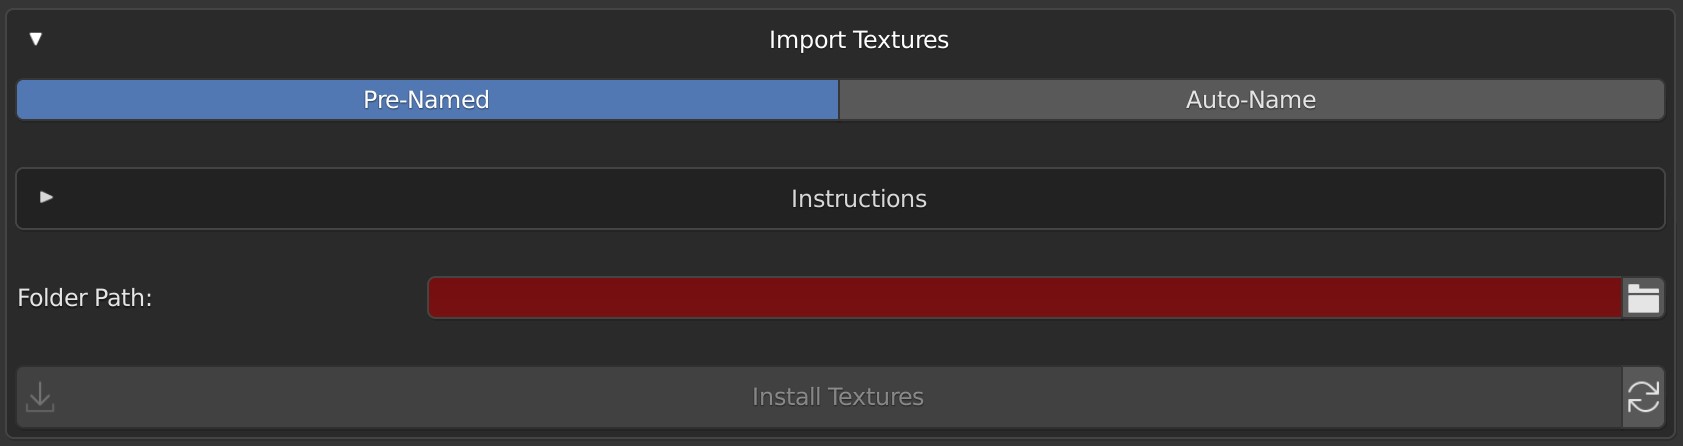
Folder Path: The path to the folder of textures you'd like to import
Tutorial:
- For this one, the Folder Path will be a folder of folders
- Each folder must be named according to the folder texture naming standard
- Each texture image must be inside its respectively named folder and named according to the texture naming standard for images and texture types
- Example: Folder - Beach_Light_Sandy_002
- Beach_Light_Sandy_002_AO_4K.jpg
- Beach_Light_Sandy_002_COL_4K.jpg
- Beach_Light_Sandy_002_DISP_4K.jpg
- Beach_Light_Sandy_002_GLOSS_4K.jpg
- Beach_Light_Sandy_002_NRM_4K.jpg
- Beach_Light_Sandy_002_REFL_4K.jpg
- In the True Terrain addon preferences click the "Import Textures" section to show settings if needed
- Navigate to your root folder for the Folder Path
- Click Install Textures to import your textures!
Auto-Name
Import textures not yet named for True-Terrain. These import types will auto-rename them for you according to True-Terrain's texture naming standard.
Single
Import a single entire PBR texture set at a time.
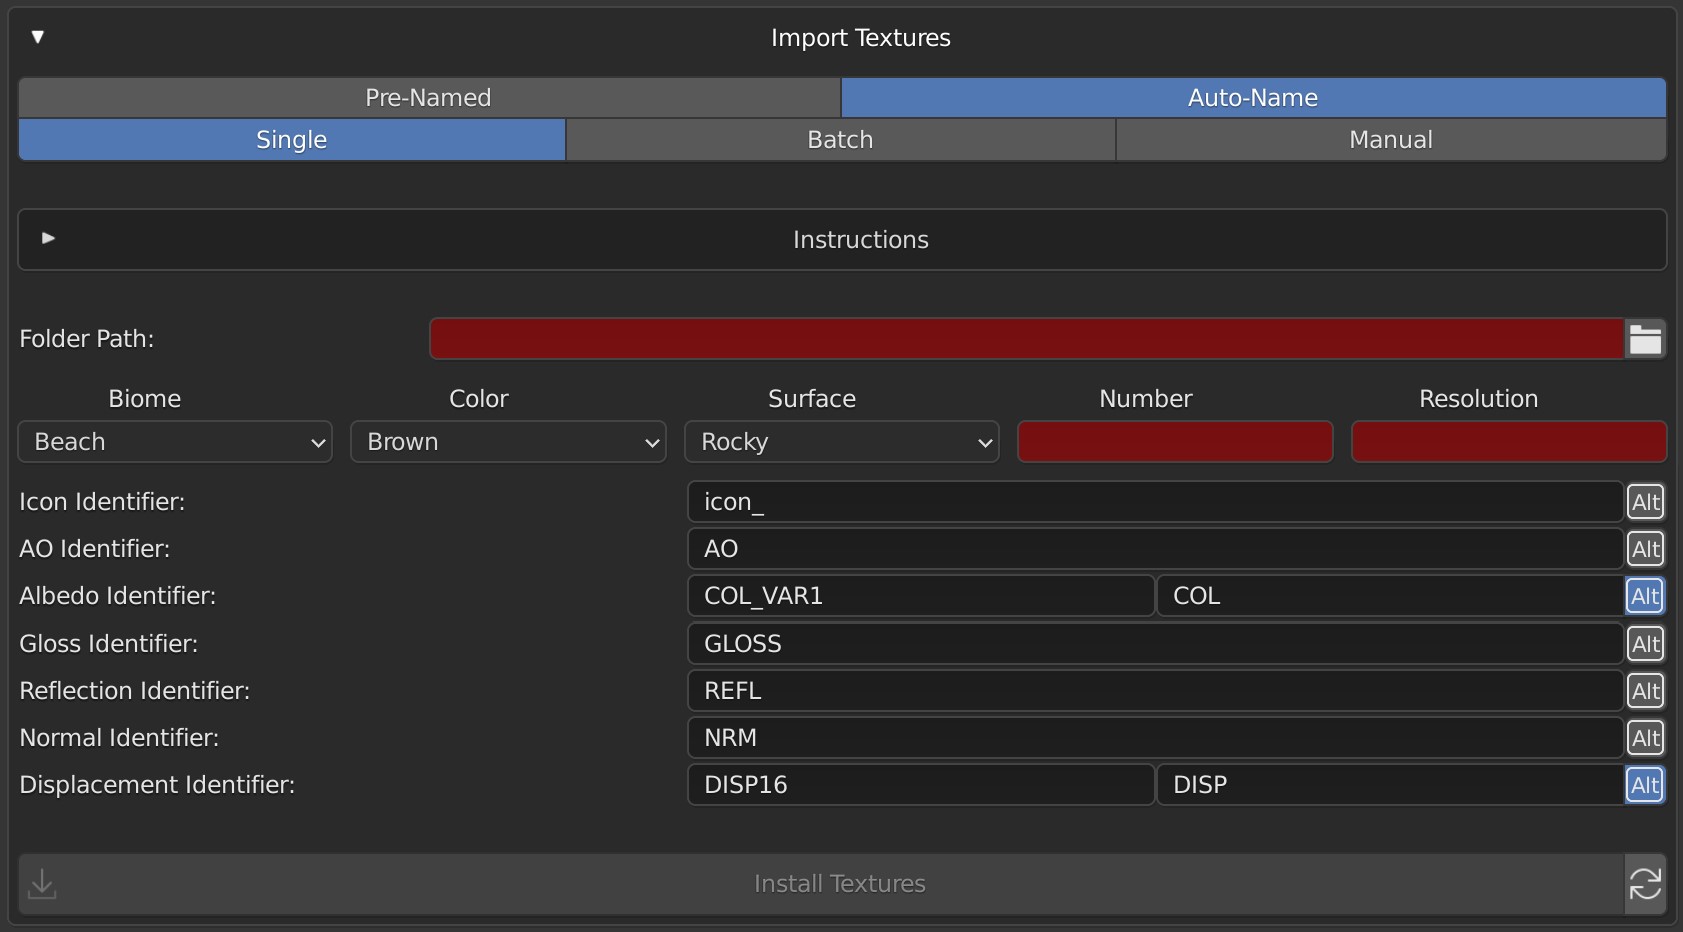
Folder Path: The path to the folder of textures you'd like to import
Renaming: These settings will be what the texture is renamed to
- Biome: The Biome category this texture should appear
- Set to Custom to create a new biome category
- Color: The Color category this texture should appear
- Set to Custom to create a new color category
- Surface: The Surface category this texture should appear
- Set to Custom to create a new surface category
- Number: A number to help with unique names. Other textures may have the same biome, color, and surface categories so a number helps keep it unique.
- Resolution: The resolution of the texture set
Identifiers: Each identifier will be the characters to search for when looking for the respective texture type.
Alt Toggle: Use an alternative identifier if the original identifier isn't found. Useful if some of the textures differ in naming occasionally
Alt Identifiers: The alternative characters to search for if the original identifier isn't found
Tutorial:
- Set up your folder's file structure
- Make sure you have all the textures you need for this texture set inside a single folder and no subfolders.
- Open up the True Terrains addon preferences and click the Import Textures section to show settings if needed
- Click the folder icon next to Folder Path and navigate to your texture set's folder
- Set up the texture's name
- Select your biome, color, and surface categories. Choose "Custom" to create a new category.
- Choose a number to help with keeping texture names unique
- Give the resolution to display in the UI. 8K, 4K, 2K, etc.
- Set up the identifiers
- For each identifier given give an identifier that can be found in the texture's file name you want to import.
- Example:
- green_grass_COL.jpg
- green_grass_NRM.jpg
- green_grass_DISP.jpg
- green_grass_REFL.jpg
- green_grass_GLOSS.jpg
- icon_green_grass.jpg
- With the given texture names putting in "_COL" for the Albedo Identifier will make sure "green_grass_COL.jpg" is selected as the Albedo/Color texture
- Finally, click Install Textures and enjoy your new texture set!
If the name of the asset already exists a message in red will appear to let you know, though you can still proceed if you are wanting to overwrite the already exisiting texture.
Batch
Import multiple PBR textures sets. A folder of True-Terrain standard named folders is expected. What's inside those folders only needs to match the identifiers.
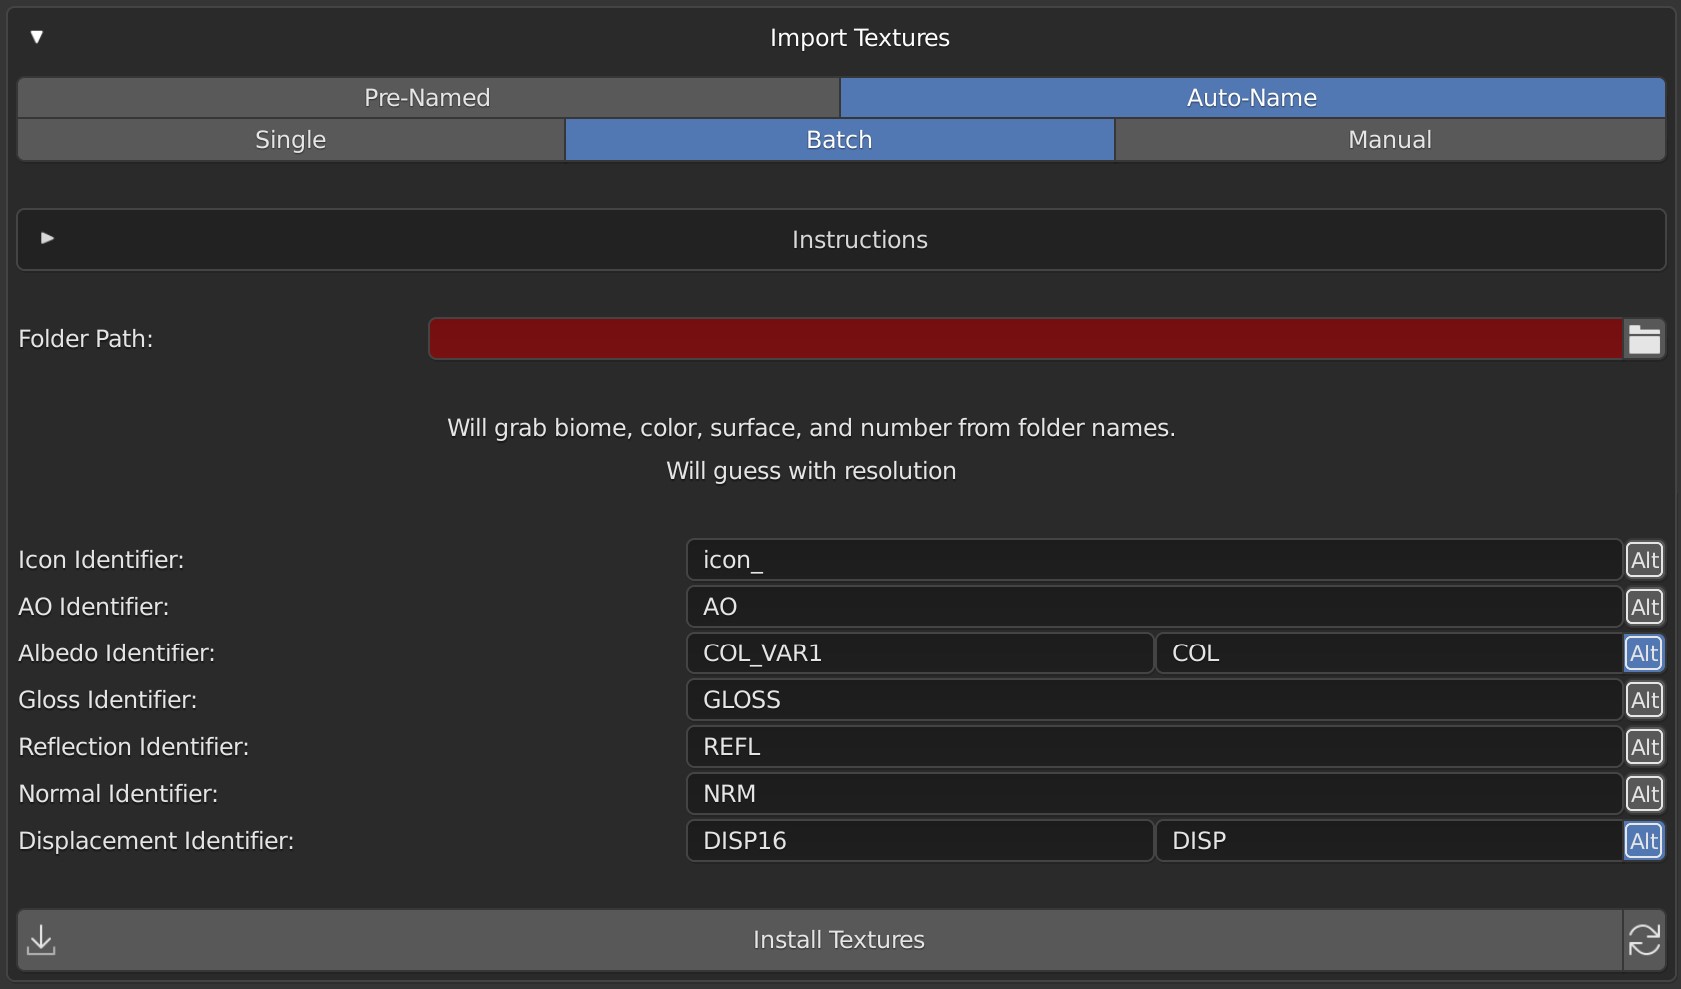
Folder Path: The path to the folder of textures you'd like to import.
Identifiers: Each identifier will be the characters to search for when looking for the respective texture type.
Alt Toggle: Use an alternative identifier if the original identifier isn't found. Useful if some of the textures differ in naming occasionally
Alt Identifiers: The alternative characters to search for if the original identifier isn't found
Tutorial:
- Prepare your file structure
- Notice in the example below. "folder_auto" is the root folder and the folder you'd end on when choosing the path to input into Folder Path.
- The subfolders Desert_Tan_Rocky_003, Field_Green_Rocky_003, and Urban_Grey_Road_001 are all folders named according to True-Terrain's folder naming standard containing textures.
- The name of the texture set will be whatever the folder is named, hence why it must meet True-Terrain's naming standard
- Inside the Desert_Tan_Rocky_003 folder are the images you see displayed.
- None are named according to True-Terrian's image naming standard but do match the identifiers in the settings image displayed at the beginning of this section (the Batch section to be precise).

- Open up the True Terrains addon preferences and click the Import Textures section to show settings if needed
- Set up the identifiers
- For each identifier given give an identifier that can be found in the texture's file name you want to import.
- Example:
- With the given texture names we see in the File Structure Example image above the following identifiers could be employed:
- Icon: "_Sphere"
- AO: "_AO_"
- Albedo: "_COL_VAR1_"
- Gloss: "_GLOSS_"
- Reflection: "_REFL_"
- Normal: "_NRM_"
- Displacement: "_DISP_"
- Notice I included the "_" before and after the texture type. It is wise to be as precise as you can be.
- Set up alternative identifiers

- If you have textures that could be identified one way in one texture set and a different way in another texture set toggle on Alt and give an alternative identifier for when the first identifier is not found.
- The first identifier on the left side will be searched for first and then only if the first identifier is not found the second identifier will be searched for.
- Example: So with the texture names we see in the File Structure Example image above we see that there are 2 textures that could match an identifier of "_COL_" so I must choose a more precise identifier. However, I know in the Field_Green_Rocky_003 texture set the albedo texture is only "_COL_" so here I can use the alternative identifier. In the first field, I put the more precise identifier "_COL_VAR1_", and in the second the less precise "_COL_".
- If your need of the alternative identifier is not about preciseness but instead textures are just named differently (such as one might be identified by "COL" in one set while in another it is identified as "ALB") the order in which you input the identifiers might not be important
- Click Import Textures and enjoy all your new texture sets!
No errors or messages will appear if an importing texture set has the same name as an exisiting texture set when using the Auto-Name Batch method
Manual
Import a single PBR texture set. Choose the file path for each texture. None of the textures need to be named anything special. Install Textures will name them all correctly.
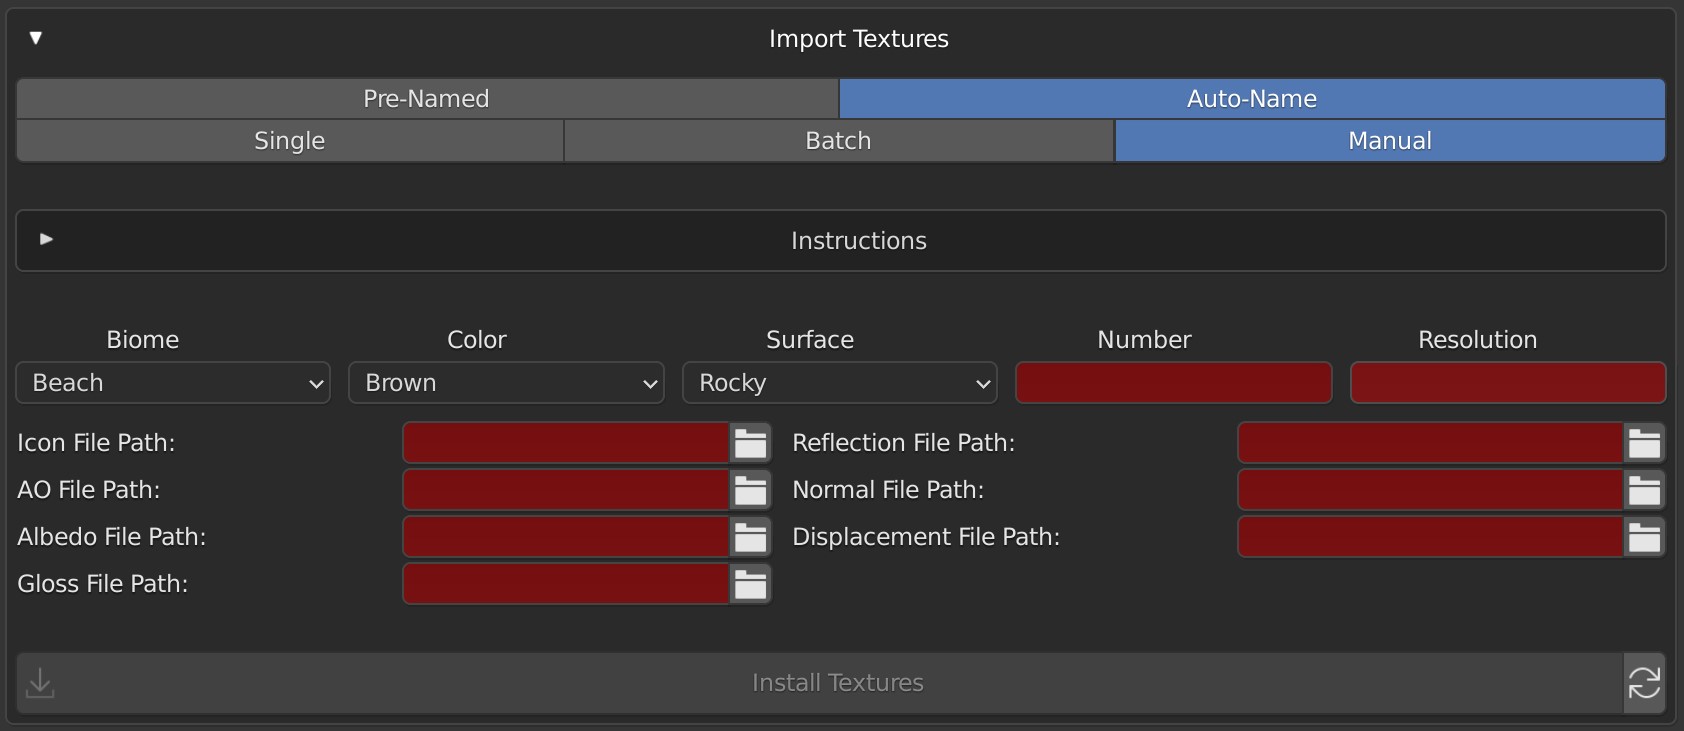
Renaming: These settings will be what the texture is renamed to
- Biome: The Biome category in which this texture should appear
- Set to Custom to create a new biome category
- Color: The Color category in which this texture should appear
- Set to Custom to create a new color category
- Surface: The Surface category in which this texture should appear
- Set to Custom to create a new surface category
- Number: A number to help with unique names. Other textures may have the same biome, color, and surface categories so a number helps keep it unique.
- Resolution: The resolution of the texture set
File Paths: Choose the file path to the texture for the respective texture type
Tutorial:
- Open up the True Terrains addon preferences and click the Import Textures section to show settings if needed
- Set up the texture's name
- Select your biome, color, and surface categories. Choose "Custom" to create a new category.
- Choose a number to help with keeping texture names unique
- Give the resolution to display in the UI. 8K, 4K, 2K, etc.
- Select your paths for each texture type
- Click the folder icon next to each field and navigate to the image file you want for that texture type
- Finally, click Install Textures and enjoy your new texture set!
If the name of the asset already exists a message in red will appear to let you know, though you can still proceed if you are wanting to overwrite the already existing texture.
Import Assets
Import assets not from True VFX
Batch
Import multiple assets from your computer.
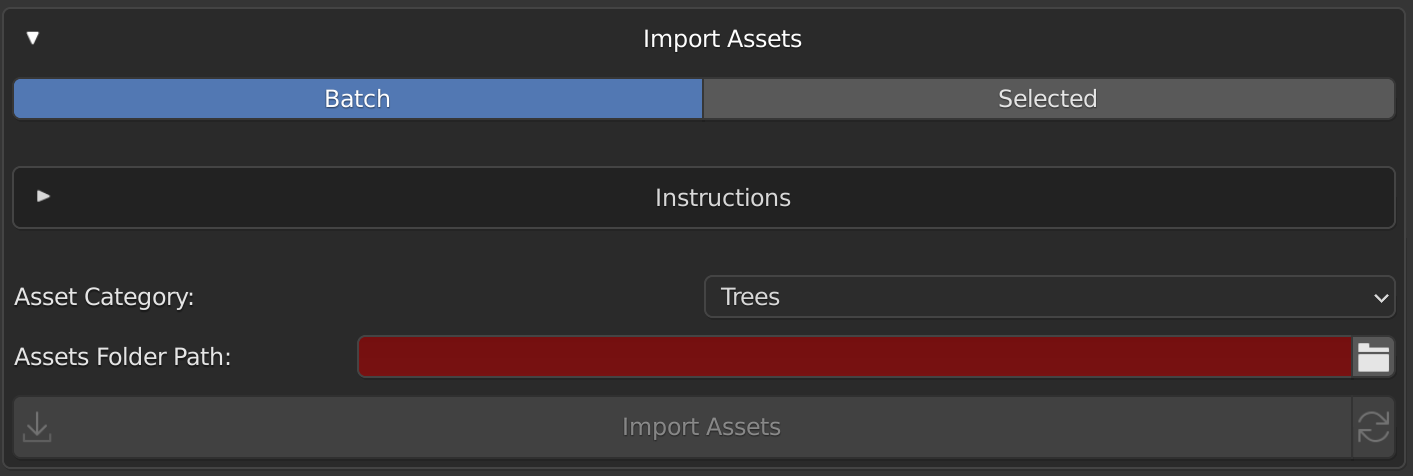
Asset Category: The group to include the asset into
Custom Category: Choosing "Custom" will allow you to create a new Asset Category
Assets Folder Path: The path to the folder where the assets and their icons are located
Import Assets: Import assets from the folder path into their appropriate category
Reload Assets: Reload all assets. Useful if you've gone in and messed with the assets in the addon folder yourself.
Tutorial:
- Prepare your file structure
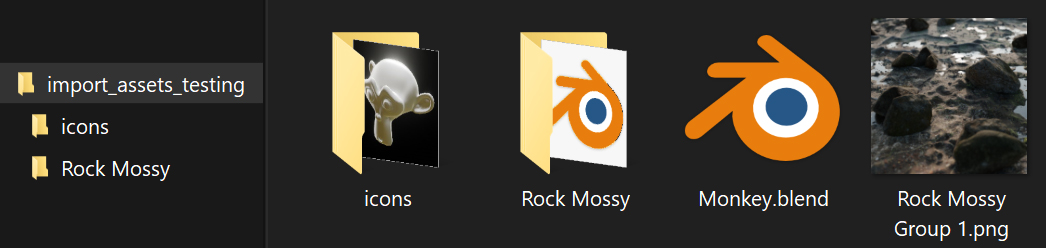
- Notice in the image below that my root folder is "import_assets_testing"
- Inside are a myriad of folders and files. The order and placement of these folders and files do not matter, only that the asset's blend file and its respective icon are named the same (ie Rock Mossy Group 1.png and Rock Mossy Group 1.blend). To prove this I've placed the Monkey.blend's icon inside a folder named icons and the Rock Mossy Group 1.png blend file inside a folder named Rock Mossy. True Terrain will grab all files inside of the root folder and match the icon to then blend file.
- To keep consistency with your icons, we recommend rendering them out as a perfect square at a resolution of 256x256 or 512x512.
- Also, notice that there aren't any textures included in this root folder. True Terrain will only grab the textures that are attached to an asset object. So it will pull the file path from what is saved in the asset's blend file, meaning make sure that all images in your asset's textures can be found by the blend file in the root folder.
- Prepare your blend files
- Each asset's blend file needs the assets to be in collection(s) named according to its/their quality level.
- Notice that there are multiple assets or variations of the asset in this blend file. Each variation needs to be in the same order in its collection. So the first object in the 01_Low collection must correspond to the first objects in the 02_Medium and 03_High collections
- Notice that the collections are given numbers at the beginning of their name for alphabetical purposes. True Terrain is at the mercy of the order that things are given in your OS's file structure which is alphabetical. Simply having quality levels named "Low", "Medium", and "High" will result in an order of "High", "Low", "Medium" in the True Terrain UI since that is the way it is found in the file structure. Adding numbers to the beginning of the collection name will make sure your intended order is kept. Separate the number and the quality level title you want to be displayed with an underscore (_). True Terrain will edit out the number and underscore at runtime.
- Notice that there are other objects in this blend file. True Terrain will only import objects in collections. So "Plane" and "Sun" will not be imported since they are not in any of the collections.

- Go into True Terrain's Addon Preferences and click the "Import Assets" section to show its settings if needed.
- Select your asset category! Here we are adding the assets in as rocks. (Yes, monkeys are being counted as rocks here. You may categorize your assets however you'd like)

- Find the folder that has all of your asset blend files and icons. In our example here this would be the "assets_import_testing" folder from before. Remember, textures do not have to be in this folder, however, the textures in the blend files do need to correctly point to the textures on your computer.
- Finally, click the Import Assets button!
- A dialogue box should appear telling you how many assets were imported and if any of the textures couldn't import because the file paths were incorrect.
Selected
Create a new asset(s) from the selected objects in the active Blender scene.

Asset Name: Name of the asset to display in the UI
Asset Category: The group to include the asset into
Custom Category: Choosing "Custom" will allow you to create a new Asset Category
Quality Level: The level of quality this asset will be labeled as.
Render Icon: Whether or not to render an icon after importing.
- The following will happen when rendering (or rerendering) the asset icon:
- All mesh objects are hidden in the render except those selected, so lights, empties, curves, and other non-mesh items will still be rendered unless you hide them from rendering (toggling off the camera icon in the outliner)
- Renders the object from the current viewing angle.
- Make sure only one 3D Viewport area is open in all windows Blender has open of this scene
- Uses Eevee to render
- Opens up the image viewer to preview the icon
Rerender Asset Icon: Rerender the icon with all the above happening again
Create Asset from Selected: When all necessary settings are filled press here to create a new True Terrain asset from the selected object(s). If more than one object is selected, all will be included and will be scattered about as individual objects when scattered instead of the entire group. Useful for different variations of the same type of asset.
Tutorial:
- Select the object(s) you'd like to become a new asset
- In Viewport Shading mode with Eevee as your renderer make sure you like the way your assets look.
- Turn on or off any Eevee setting and make it look nice!
- Align your 3D Viewport view to the angle you want your icon to be rendered at. Only renders in perspective mode.
- Open up True Terrain's Addon Preferences and click the "Import Assets" section to show its settings if needed.
- Select the asset you'd like the selected objects to be included in or select "Custom" to create a new asset
- Select what category the chosen asset is to be in
- Name the Quality Level. Remember to add in a number to help keep the order you'd like your quality levels to be in. Adding decimal points to numbers will work if you're needing to add in a quality level between two consecutive numbers (ie you already have a 01_Low and a 02_Medium but you want to add in a Medium Low quality level, "01.5_Medium Low" will give you what you want)
- Make sure Render Icon is checked if you are creating a new asset
- Click Create Asset from Selected to create your asset and render an icon if checked